Requesting a Brightspace sandbox class
This article describes applications for Brightspace sandbox courses and how to request one from TLT. It is intended for instructors and others members of the WSU community who are interested in using Brightspace for an instructional purpose that is not associated with an official academic course or term or simply to stage a course before it is offered officially to the student population.
What is a sandbox course?
While Brightspace course shells are created automatically every term for every section of every course being offered for academic credit, TLT can also create Brightspace course shells manually at any time for other purposes. Instead of associating them with a particular semester, these courses are assigned to special categories like "Sandbox" or "Professional Development." These sandbox course shells have all of the features and functions of academic course shells and can be used as long as needed. You can also have as many different sandbox courses as you need. Here are some popular applications:
- Stage an upcoming academic course. Although academic course shells are available for preparation purposes months before the start of a given term, you may want to begin working on a course even sooner or you may want to work on a proposed course that's not on the books yet. Use a sandbox course as a staging area for an upcoming academic course. Take as much time as you need to build the course, perhaps working with colleagues from your own or other departments who can also be enrolled as teachers. Copy it over to your academic course shell when it's ready. Tweak the sandbox course as you gain more experience teaching the academic course.
- Workbench for building learning activities. Sandbox courses are great places to develop new projects, rubrics, content, or just about anything in Brightspace without having to worry about experimenting in a live course. Again, invite your colleagues to collaborate.
- Develop non-academic courses. Build courses and professional development opportunities for your department, your student workers, or other campus groups that are not limited to the duration of an academic term. When you are ready, TLT can help you enroll people or you can use the self-registration feature of D2L to allow people to enroll themselves.
- Develop a shared department or course repository. Store and reuse learning materials and activities within your department or across the faculty who teach a particular course. Combine a sandbox course with a Brightspace Learning Object Repository to fully support resource sharing and reuse in Brightspace.
How do I get a sandbox course of my own?
You can create your own sandbox courses by using the Request Help widget on your course homepage.
Step 1: At the bottom of the main Brightspace page, go to the menu (three horizontal lines in the top left corner) in the Request Help widget (Fig 1).
Step 2: Select “Dev Course Request” (Fig 2).
Step 3: Click the plus (+) sign in the top right corner (Fig 3).
Step 4: Enter the name of the sandbox (for example, “TLT 401 Sandbox”) in the Course Name field (Fig 4).
Step 5: Toggle the Add Sample Course Materials to No (Fig 4).
Step 6: Click “Submit” (Fig 4).
A new sandbox course will be created in the Sandbox semester tab with the format:
DEV: (Name from Step 4) – Your Name
Example: DEV: Practice – Aurea Osgood
You will be added to this course as a Sandbox Instructor, which allows you to enroll and unenroll others into this sandbox.
Two "sample" students will also be enrolled (Sample Student1 and Sample Student2).
If you need changes to the configuration of your sandbox course, email tlt@winona.edu and include a description of the changes you need.
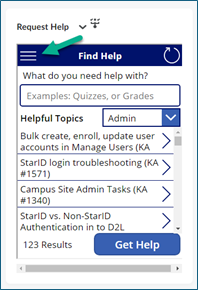
Figure 1. Sandbox Step 1
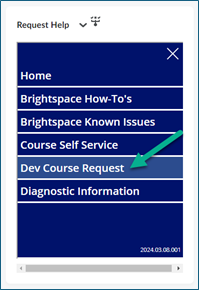
Figure 2. Sandbox Step 2
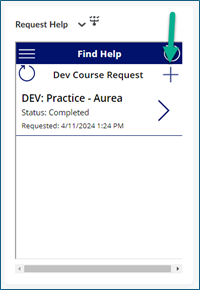
Figure 3. Sandbox Step 3
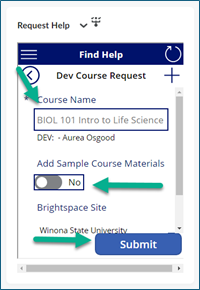
Figure 4. Sandbox Step 4


How do I add participants to my sandbox course?
If you are the person who requested the sandbox course, you will be enrolled in the course with Sandbox Instructor permissions. What makes Sandbox Instructor unique is that it begins with all of the permissions of the full Instructor role plus the ability to enroll and unenroll others in the course. It is important to note that this ability is only available in sandbox courses.
Adding participants

Once you receive notification that the course is ready to go and you have been enrolled as the Sandbox Teacher, you can get into the course and enroll whomever you feel is appropriate. Here are the steps in enrolling other participants:
- Enter the sandbox course, click on Communication in the navigation bar, and select Classlist from the pop-up menu.
- Click the blue Add Participants button.
- Select Add existing users from the pop-up menu.
- Enter a portion of the person's name or their Star ID in the search field and click the magnifying glass. See #4 below.
- Check the box in front of the person's name you wish to enroll and set the roll in the selection box. See 5a and 5b below.
- Click the Enroll Selected Users button at the bottom. See #6 below.
As a Sandbox Teacher, you are allowed to add participants in the following roles:
- Student - Access content and personal grades, submit assignments and post discussions.
- Instructor - Full access to course materials, grades, submissions.
- Sandbox Instructor - Same as Teacher plus the ability to enroll and unenroll participants.
Removing participants
- Enter the sandbox course, click on Communication in the navigation bar, and select Classlist from the pop-up menu.
- Check the boxes in front of the names of the people you wish to remove from the course.
- Click the Unenroll link directly above the list of names.
- Answer Yes in the pop-up dialog box.
Changing roles for current participants
- Enter the sandbox course, click on Communication in the navigation bar, and select Classlist from the pop-up menu.
- Check the boxes in front of the names of the people whose roles you wish to update.
- Click the Enrollment link directly above the list of names.
- Select the new role for each participant you are updating.
- Click Save.