Signature File (Creating on Tablet)
With the help of the tablet laptop, it is now very easy to place your signature on email, contracts, or any other computer files.
Switch to Tablet Mode
If it is not already - switch your laptop screen around so that it is in the TABLET MODE (swivel the monitor screen around and snap it down) and get out your stylus out (it is located in the front right corner as the open laptop faces you).
Calibrate Your Pen
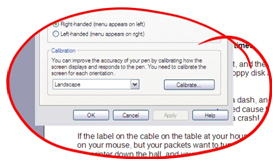
If you have not already calibrated your stylus pen you need to do so now. In the system tray, double-tap (the tablet and pen settings icon), and then tap Calibrate tab. You need to calibrate how the screen displays and responds to the pen. You need to calibrate the screen for each orientation.
- To calibrate the screen, tap the crosshair each time it appears on the screen, and then tap OK.
- Do not change your screen orientation until you have completed the calibration. Click on OK when done.
Windows Journal
Setup Toolbars, Pen Style and Color
On Your Gateway Convertible Tablet Laptop in tablet mode:
- Open up Windows Journal. (tap Start > All Programs > Windows Journal)
- Windows Journal will open up to a blank notebook page.
- On the top menu tap on View > Toolbars. Make sure that the STANDARD and PEN toolbars have a checkmark in front of them. If they do not please check them so they are showing on your screen. Your pen toolbar should look like this:
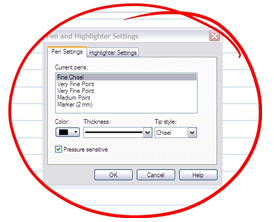
- Tap on the arrow to the right of the “pen” icon (1) in the toolbar and choose Fine Chisel for your pen style. (this style is a bit thicker than the other choices but not as thick as a marker. When saved in graphic form it shows up better than the others.)
- Make sure the pen color is black or blue – again these show up much better than other colors when saved as a graphic. You can change the pen color by by tapping on “pen settings”, choose Find Chisel and then choose the color you wish.
NOTE: If after you save your signature file you feel that it does not look the way you want it to look you can come back to this step, change your pen choice and color and redo your signature.
Create Signature
- Write your name (signature) a few times on the blank notebook page to get the feel of the stylus. You can use the eraser (icon #3) to erase all your “experiments”.
NOTE: Keep the size reasonable, a good rule of thumb is to try and limit it to within one line on the default Journal lined paper.
Copy Signature to Clipboard
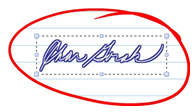
- When you get a signature that you are happy with, click on the "Lasso" selection tool, and outline your signature (draw a circle around it). Once outlined the signature will appear in a box with handles as shown below:
- Press and hold stylus down on the selected ink until right menu appears and tap on "copy" to copy your signature to the clipboard.
Copy and Save in Graphic Editor
- Open up your graphic editor of choice (we'll use MS Paint for this document (Start > All Programs > Accessories > Paint).
- Choose Edit-Paste, which will add your signature (from the clipboard) onto your canvas.
- VERY IMPORTANT!
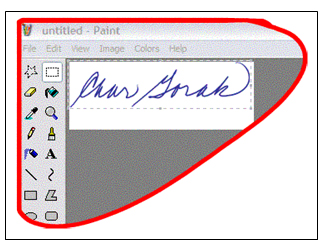
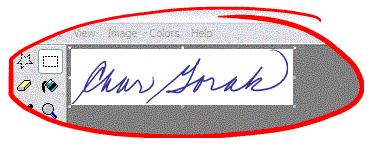
In order to keep the size of your signatures minimal, please be sure and resize the "canvas" of your image by tapping on the white area and going to the bottom right hand corner of the canvas, grabbing the resize handle (a two sided arrow) and dragging the white canvas up until you outline the signature. You want the smallest amount of white canvas possible that fits your signature. If you do not do this you will have lots of white space around with the signature which will take up extra space on your documents. It should look like this before you save it:
- Choose "File-Save As".
- Choose which folder on your laptop you want to save the file to in the “Save In” field at the top of the box.
- The name of your file goes in the File Name field on the bottom of the box.
- Pick which graphic format you would like using the drop down list under "Save as Type:". (You can save the signature as anything you want but with a gif file you can make the background transparent if you wish to do so.)
- Tap on SAVE once you have this information filled in.
Note: To save the file you can either open up and use the Input Panel to name your document and save it or you can swivel your screen back to laptop mode at this point and type in your information.
If you choose to use the Input Panel:
- Tap on the Input Panel icon in the bottom tray.

- This will bring up the Input Panel Screen and you can tap out your file name.
Note: (You can save the signature as anything you want but with a gif file you can make the background transparent if you wish to do so.)
- If you get a message saying something about this type of file may cause discoloration – just go ahead and say yes to save the file.
Sample Signature (saved as *.gif)
This is how the signature will appear on a Word document:
Close Applications
- Close down Paint (Tap on File > Exit.)
- Close down Windows Journal (Tap on File > Exit.)
To Insert Signature in Document
- Open Microsoft Word
- Open desired document
- Tap pen on the desired location for the signature file
- From the top menu tap on:
- Insert
- Picture
- From File
- Tap out path to folder with signature
- Tap on signature file
- Tap on Insert
- Resize as necessary
