Adobe Photoshop/Printing Pictures
You can use Photoshop to print a variety of graphic or picture files. These include the common formats used by Digital Cameras such as JPG, PNG, RAW, and TIFF. Also virtually all kinds of bit-mapped or pixelated graphics such as BMP and GIF. Photoshop also handles its native (PSD) files and the Adobe PDF format which is used by Adobe Reader, Illustrator and so on.
The purpose of this section is to help you print pictures such as photographs, or manage PDF files for printing.
How to Print a Photograph or PDF File
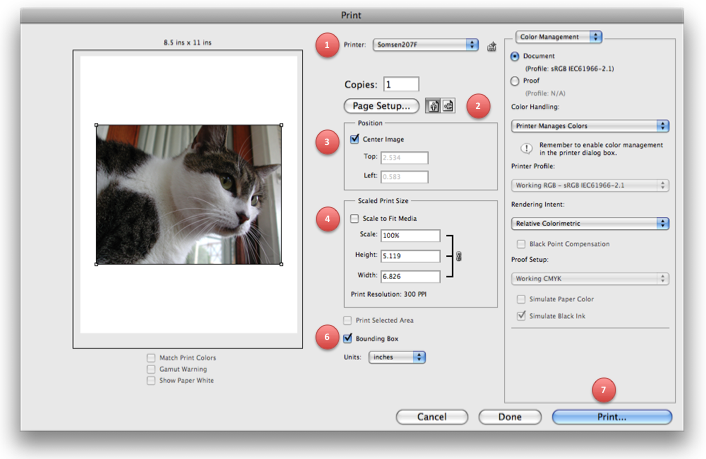
Use the Print Command on the Menu File>Print (or the keystroke combo Command-P) to open the Print dialog. The image will appear in the default page size for the printer. Normally 8 1/2 x 11 inches.
- The Printer is the first thing you should check. Is this the correct printer?
- Next, determine if you want to print in landscape or portrait mode. See below for Page Setup Changes if you want to change the paper size.
- Next, do you want to change the print size from the default? Do you want to "stretch" it out to the edges of the paper? In the example here, if you had changed to "landscape" mode and put a check into the box for Scale to Fit Media. The photo would stretch out to the page size, while still keeping its original proportions. Warning! This will change the resolution of the photo. See below for more information about resolution.
- Next, by default it will print a "bounding box" or line around the picture. If you do not want this, uncheck the box.
- Finally, click on Print.
- Note: you can also make changes to how colors are handled. These are advanced features that generally you do not need to address. But sometimes if the color on your computer image and the color printed out do not match, this is where the problem lies. See more information about this in Photoshop/Advance Features.
Sizing the Picture
When printing, specify image size in terms of both the printed dimensions and the image resolution.
These two measurements determine the total pixel count and the file size of the image.
You can manipulate the scale of the printed image using the Print command; however, changes you make using the Print command affect only the printed image, not the document size of the original file.
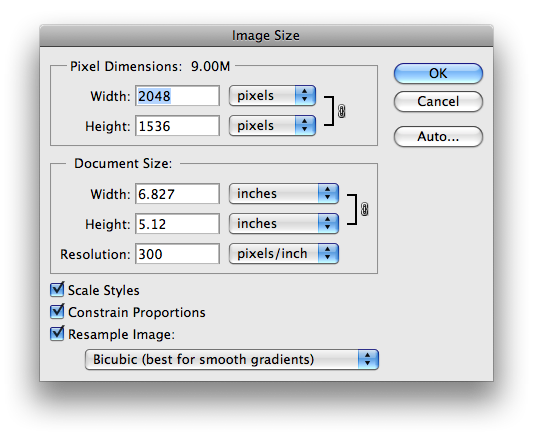
- 1. Choose Image > Image Size.
- 2. Change the print dimensions, image resolution, or both:
- NOTE: If you turn on resampling for the image, you can change print dimensions and resolution independently (and change the total number of pixels in the image). If you turn off resampling, you can change either the dimensions or the resolution—Photoshop adjusts the other value automatically to preserve the total pixel count. For the highest print quality, it’s generally best to change the dimensions and resolution first, without resampling. Then resample only as necessary.
- To change only the print dimensions or only the resolution and adjust the total number of pixels in the image proportionately, select Resample Image and then choose an interpolation method.
- To change the print dimensions and resolution without changing the total number of pixels in the image, deselect Resample Image.
- NOTE: If you turn on resampling for the image, you can change print dimensions and resolution independently (and change the total number of pixels in the image). If you turn off resampling, you can change either the dimensions or the resolution—Photoshop adjusts the other value automatically to preserve the total pixel count. For the highest print quality, it’s generally best to change the dimensions and resolution first, without resampling. Then resample only as necessary.
- 3. Check Constrain Proportions to keep the current ratio of width to height.
- This option automatically changes the width as you change the height, and vice versa.
- 4. Under Document Size, enter new values for the height and width.
- If desired, choose a new unit of measurement.
- 5. For Resolution, enter a new value.
- If desired, choose a new unit of measurement.
To restore the initial values displayed in the Image Size dialog box, hold down Alt (Windows) or Option (Mac OS), and click Reset.
Resampling & Resolutions
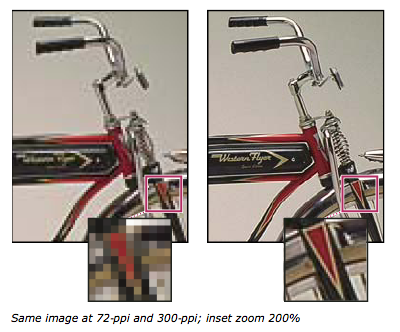
The combination of pixel dimension and resolution determine the amount of image data. Unless an image is resampled, the amount of image data remains the same as you change either the pixel dimension or resolution. If you change the resolution of a file, its width and height change accordingly to maintain the same amount of image data, and vice versa.
Resampling is changing the amount of image data as you change either the pixel dimensions or the resolution of an image. When you downsample (decrease the number of pixels), information is deleted from the image. When you resample up (increase the number of pixels, or upsample), new pixels are added. You specify an interpolation method to determine how pixels are added or deleted.
Photoshop resamples images using an interpolation method to assign color values to any new pixels based on the color values of existing pixels. You can choose which method to use in the Image Size dialog box.
- Bicubic Smoother: A good method for enlarging images based on Bicubic interpolation but designed to produce smoother results.
- Bicubic Sharper: A good method for reducing the size of an image based on Bicubic interpolation with enhanced sharpening. This method maintains the detail in a resampled image. If Bicubic Sharper oversharpens some areas of an image, try using Bicubic.
In Photoshop, you can see the relationship between image size and resolution in the Image Size dialog box (choose Image > Image Size). Deselect Resample Image, because you don’t want to change the amount of image data in your photo. Then change width, height, or resolution. As you change one value, the other two values change accordingly.
Changing the Canvas Size of the Image
If you change the picture size to something closer to what you want to print, and you keep the original proportion, you may end up with an image that is little to wide or a little long for the picture size you want to print.
You can crop it manually. Or you can use the Canvas Size to crop the image.
Cropping is discussed in Photoshop/Basic Picture Edits.
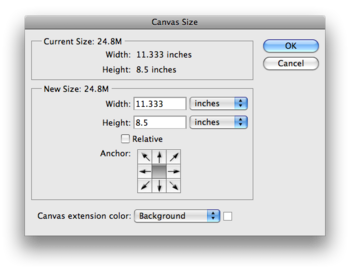
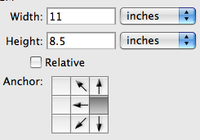
To change canvas size, choose the menu Image>Canvas Size.
In the example shown, the original image was resized so that it would fit on an 8 1/2 x 11 inch page. But in keeping the proportions, the image was resized to something just a little too long.
It needs about 1/3 of an inch trimmed off of one side of length of it.
The dialog box permits the direction to which the canvas is increased or decreased. In the example here, the canvas will be decreased in the direction the left side of the image, that is, the right side will be trimmed off.
Other Resources
For help from Adobe on Printing: Go Here!
