GarageBand (Mac)/Recording and Making Tracks
You can record your voice or any other sound you can capture using a microphone. If you play a musical instrument, you can also record it in a GarageBand project.
In GarageBand, you record sound from a microphone or from a musical instrument connected to your computer in a Real Instrument track.
In this help , you’ll learn how to:
- Record a track
- Add a track and change settings
- Record over a specific part of a project using the cycle region
- Record multiple takes
The Basic Window
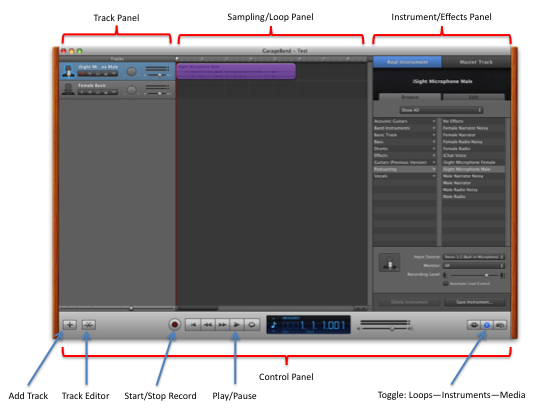
Real Instrument tracks have blue headers, and the regions containing your recordings appear purple. You can change track settings and add effects to Real Instrument tracks in the Track Info pane.
Use the Control Panel for several basic activities.
- The Record Button is a toggle. Your built-in microphone is on by default. Push to start recording. Push to stop.
- The Play button also toggles between play and pause. To the left of it are the conventional buttons for return to start, fast reverse, fast forward. To the left of it is the button for looping the selected the track.
- To the far left are buttons for 1) Adding another track and 2) opening the Track Editor Panel (which will be discussed in the GarageBand/Editing).
- To the far right are three buttons. The one selected at present toggles open/shut the Instrument Browser. To the left of it is a button for the Loops Browser. To the right is a button for the Media Browser.
Recording to a Track
If you have chosen “Vocal” as a project, it will open by default to two tracks.
One track is preset for “Basic Male.” The other is set to “Basic Female.” You may use either of these. These presets include some modulations or effects which are deemed to be good for male and female voices.
We will review how other effects may be applied to these tracks and how these presets may be modified.
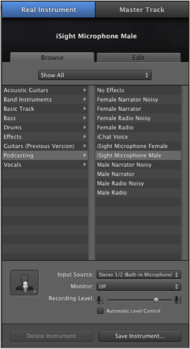
If you intend to use the iSight built-in microphone, choose Podcast on the left hand column of “Instruments.” Then choose iSight Microphone Male or iSight Microphone Female, as you wish.
- Note that Podcasting, as an instrument selection instead of Voice, offers unique preset effects.
- Note that your recording is also predefined at the bottom of the panel with a selected “Input Source.”
- Note that monitor is turned “Off.”
- Note that the recording level may be changed by you using the slider to control volume.
These preset effects may be modified in several ways as well; clicking on the tab called “Edit” next to the one called “Browse” will open the view of the effects used on this preset. Now you can modify these in several ways.
You can modify special effects which are listed. You may add others. You can modify the Master Echo, Master Reverb, and manage the EQ of your track.
All of these effects can be set BEFORE recording, or AFTER recording may be changed to modify the track. Generally using minimal sets of effects, such as those preset, is recommended before recording, since your post-production sound can be edited and modified easily.
Duplicating a Track & Duplicating a Sound Sample
Duplicating a track does not duplicate the contents of the track but duplicates the effects and other options elected for that track.
To duplicate a track, select the track you wish to duplicate and use Command-D or the menu item under Track.
To duplicate the CONTENTS of a track, select the specific sample (it will change color) and use command-C (or “copy” from the Edit menu) and select the track where you wish to paste it. Use command-P (or “paste” from the Edit menu).
Adding a New Track & Recording to It
To add a Real Instrument track you need to be sure to select the type of sound you are recording:
- Click the Add Track button, or choose Track > New Track. Note: if you create a new project from the opening dialog, it will open to the selected instrument or kind of track recording automatically.
- In the New Track dialog, click Real Instrument, then click Create. A new Real Instrument track appears in the timeline, and the Track Info pane opens to the right of the timeline. The Track Info pane is where you choose different settings for the selected track.
- In the Track Info pane, select an instrument type from the list on the left, then select an instrument from the list on the right.
- Choose the audio input for your microphone or instrument from the Input Source pop- up menu.
- If you’re using your computer’s built-in microphone, choose Built-In Mic.
- If your microphone or instrument is connected to your computer’s audio input port, choose Line In.
- If your microphone or instrument is connected to an audio interface, choose the correct channel (or stereo pair of channels) from the menu. NOTE: you can select different input recording types in the left had column, including “Vocals” and “Guitars”. You can select different Effects in the right-hand column. These effects are incorporated during the recording session.
- If you want to hear your microphone or instrument as you play, choose On or On with Feedback Protection from the Monitor pop-up menu. Turning on monitoring can cause feedback (loud, sharp noise) if the audio input picks up the output from your speakers. You can choose “On with Feedback Protection” to have GarageBand automatically turn off monitoring if feedback from the input source occurs. You can also avoid feedback by listening with headphones rather than speakers. You can reduce possible feedback by making sure the microphone or instrument is pointed away from your speakers, and by turning down the master volume.
- Adjust the recording level for the track so that the level as high as possible without causing clipping or distortion. To adjust the recording level, do one of the following:
- If the instrument or microphone has a volume control, adjust the volume control on the device.
- If the instrument or microphone is connected to an audio interface, adjust the volume control on the audio interface.
- In the Track Info pane, drag the Recording Level slider left to lower the input volume for the selected channel, or drag it right to raise the input volume. Note: You can’t control the volume of some audio interfaces and other devices from GarageBand. If the Recording Level slider in the Track Info pane is dimmed, you cannot adjust the input volume in GarageBand.
- Select the Automatic Level Control checkbox to have GarageBand automatically lower the input level to avoid clipping, and raise the level to avoid excessive noise when recording. Note: If you chose “On with Feedback Protection” from the Monitor pop-up menu, you cannot select Automatic Level Control.
Our Internal Help Pages for GarageBand Include
"GarageBand" has no sub pages.
Other Resources
On the Web a good resource for help and tutorials for GarageBand is to be found at The GarageDoor


