InfoPath/Setting Up Inforpath Form to Publish
Jump to navigation
Jump to search
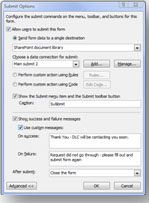
1. Under Tools click on Submit Options.
- Check Allow users to submit form.
- Choose SharePoint Document Library.
- Click on Add.
- Input the destination (SharePoint library) that you received from TLT for storing your data.
- If you are pasting in a SharePoint address you need to delete the Forms/AllItems.aspx at the end of the address.
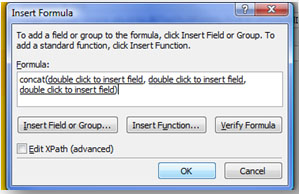
- Under File Name click on the FX button>Insert Function>choose CONCAT under Text>Fill in CONCAT fields with the desired data fields.
NOTE: It is good to use the @now configuration in one of the fields which would be displayed as now()) in one of the concat fields.
- Click on OK and then Next>
- Enter a name for data connection – can leave default or create our own name.
- Click on Finish.
- Click on Advanced.
- Use custom message:
- Type in the “on success” message.
- Type in the “on failure” message.
- After submit – close form.
- Click on OK.
2. Under Tools click on Form Options.
- Go through all options to be sure they are setup as you wish.
- For instance generally we do not want people to have the ability to SAVE or SAVE AS.
- Click on OK after you have made your choices.
3. Add a submit button somewhere on the form – usually on the bottom.
- Click on Design Tasks>Controls
- Drag the BUTTON control over to desired location
- On the form, double click on the button
- Set properties
- Action>Submit
- You can delete the & in the middle of the word SUBMIT.
- Click OK
Other Resources
Our Help Pages:


