Setting Up Groups in Brightspace
Jump to navigation
Jump to search
About this article
This article provides an overview of the many ways instructors can use the Groups tool in their Brightspace courses to support the learning experience. It is intended for instructors.
Overview
Groups are a means of organizing learners within a course into smaller units for the purpose of managing...
- Student interactions with each other (e.g., establishing a discussion forum or topic that can only be accessed by members of a specific project team)
- Student access to content (e.g., adding lab materials to a content module available to only the members of a specific lab group)
- Your communication with students (e.g., sending an email message to only the members of a specific group)
Setting Up New Groups
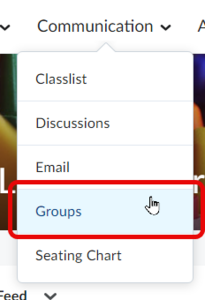
- From the Communication menu in the navigation bar, select Groups (Figure 1).
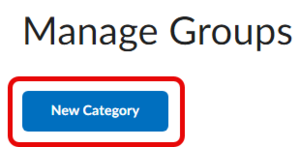
- Click on New Category to create a new group category (Figure 2).
- Name the category and add a description.
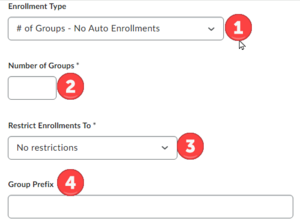
- Select the Enrollment Type (Figure 3).
- # of Groups - No Auto Enrollments: instructor will manually enroll students into a specified number of groups
- Groups of #: Students will be auto-enrolled into a specified group size
- # of Groups: Students will be auto-enrolled into a specified number of groups
- Groups of # - Self Enrollment: Students will enroll themselves into a specified group size
- # of Groups - Self Enrollment: Students will enroll themselves into a specified number of groups
- # of Groups, Capacity of # - Self Enrollment: Students will enroll themselves into a specified number of groups, with a specified capacity
- Single use, member-specific groups: Individual groups will be created for each student
- Restrict Enrollments, if needed (Figure 3).
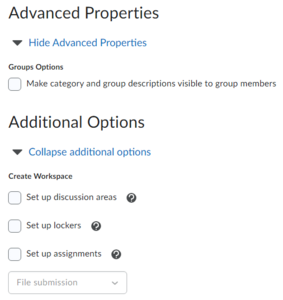
- If needed, check the box to make the description visible to students (Figure 4).
- Create Workspaces as needed (Figure 4).
Managing Categories and Groups
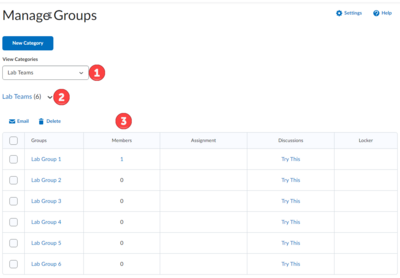
- Once a category has been created, groups will be created within that category. If you selected an auto-enroll option, students will be assigned to a group. To see the members of the group, click on the number next to the group name (Figure 5.3) or click on the group name and then View Enrollment.
- If you have multiple categories, select the appropriate category from the dropdown menu (Figure 5.1).
- To manage the category, click on the dropdown menu next to the category name (Figure 5.2). From here, you can edit the category, add a group, enroll users, delete the category, or email students.
- If workspaces were created, they will appear in the right-most columns.
For More Information
Except where otherwise noted, text is available under the Creative Commons Attribution-NonCommercial-ShareAlike 4.0 International License.
