Weighted GradeBook in Brightspace
Audience
WSU Faculty teaching in a traditional, blended, online, or ITV environment.
Overview
The Brightspace Grades tool allows you to post and share your students grades for the course. In this section you will find information on how to set up a weighted grade book. The Grades tool can accommodate both points-based and weighted grading methods, the inclusion of bonus and extra credit opportunities, the exclusion of certain items (e.g., the lowest quiz score) from the final grade, and more. The Grades tool is also integrated with other Brightspace tools used to support graded activities, including the Quizzes, Discussions, Dropbox, and Rubrics tools. Grades from these activities can be transferred to the Grades tool automatically.
In this article you will find information on how to set up a weighted grade book. A weighted grade book allows faculty to assign percentages to items and categories (i.e. groups of items) within the course grade book.
We recommend using the Setup Wizard. Using the Wizard will help you set up your grade book correctly. Once you have completed the Wizard you can start adding items to the grade book.
Enter Grades View
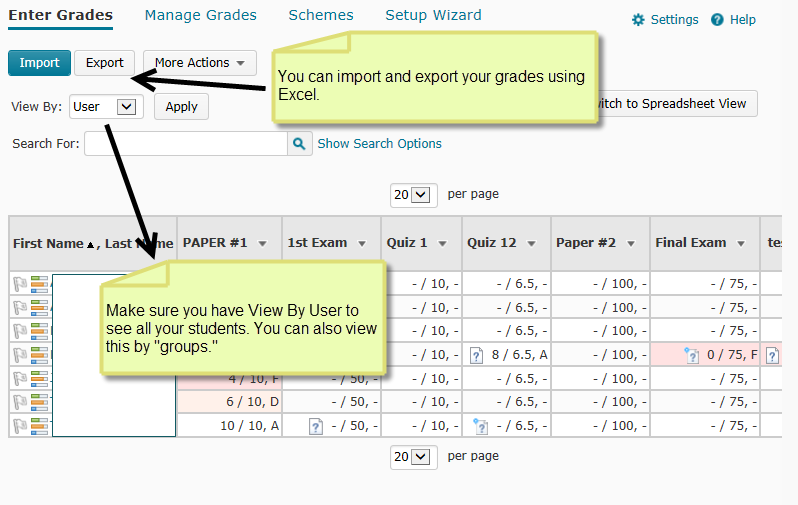
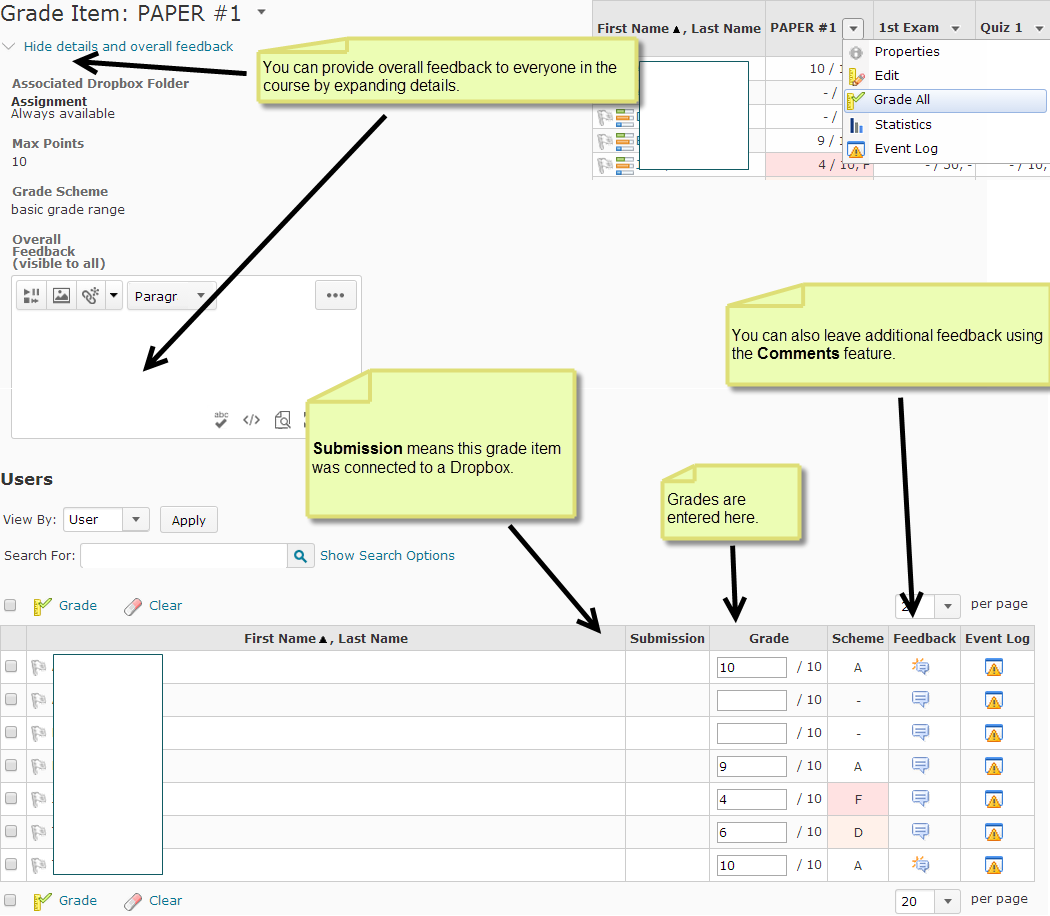
In this view you are able to enter your grades, edit grade items, delete and view stats.
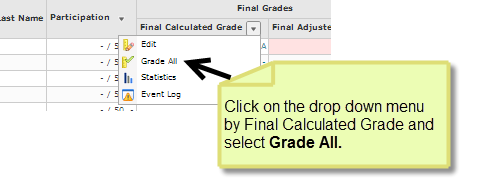
The easiest way to enter grades in this view is to pick the Grade All option in the drop down menu for the graded item.
Manage Grade View
In this view you can create new grade items or categories, delete or reorder your grade items. You can also see if the grade item is associated to something such as a Quiz or Dropbox.
Creating a Grade Item
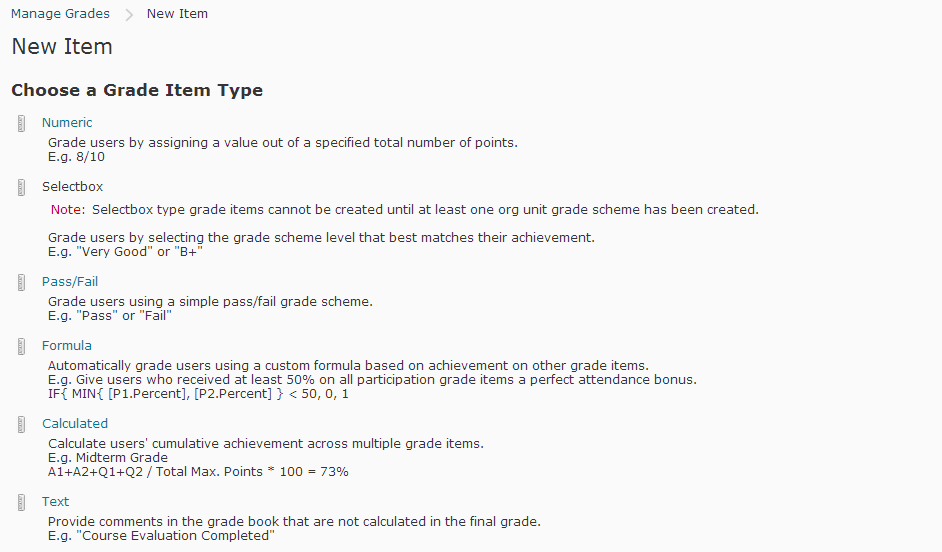
To create a new grade item just click on  . Some faculty like to organize their grade items by category such as quizzes, tests, class participation and assignments. This can be helpful for if a students needs to understand why their grade might be low. You can calculate the grade by category. Once you pick New Item you will be given several different choices as far as the type of grade item you want use.
Numeric Grade Item
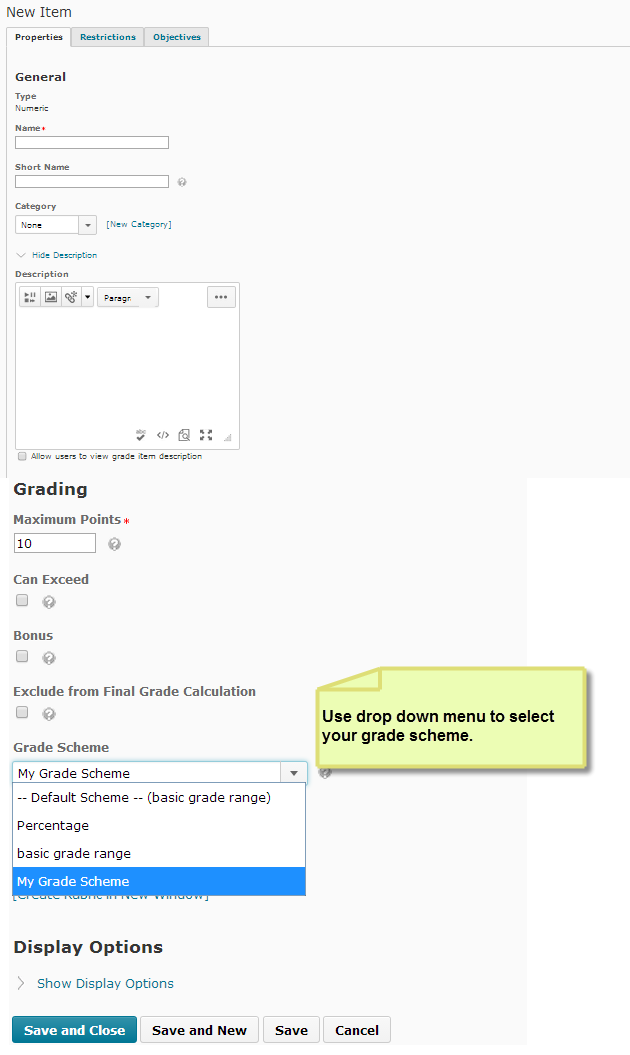
1. In this area you will Name the item, you can also give it a Short Name to save space in the grade book, and connect to a Grade Category.
2. Put in the number of points possible for this grade item.
3. If you use categories in your weighted grade book you will need to assign weight value.
4. If you check Can Exceed, students will be able to get more the possible points for the grade item. If you check Bonus, this means all points will be counted as extra credit. if you check Exclude from Final Grade Calculation, none of the points a student earns for this item will show up in their final grade calculation. This is a good feature for practice quizzes.
5. Most faculty use the Default Scheme-(Percentage:) 100%-90% is an A, 89%-80% is a B...ect.
You may wish to set up a grading rubric to grade items and directions about the Rubric Tool and creating a rubric are found at Creating Rubrics in Brightspace.
6. You have several options to save this grade item.
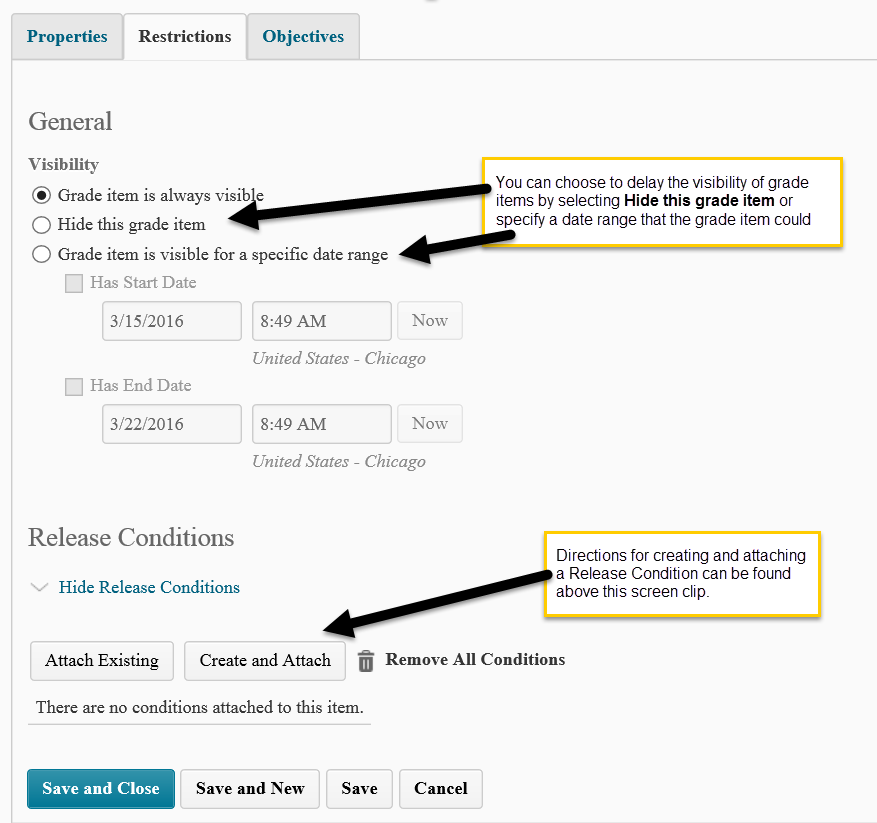
Restriction Tab
Some wish to delay the release of grade items while they complete grading the entire class. You can manually do this process by hiding the grade item or setting a specified date as the clip shows below. You also have the option to build a Release Condition (see directions for setting release conditions here) so students cannot see grades until they meet your condition for this grade item.
Creating a Grading Scheme
You have two options for the D2L Default grading scheme. Percentage will show students their grades in a percentage: 90%-100 is an A, 80%-89% is a B...ect. Basic Grade Range will only show students a letter grade such as an A or B. To create your own custom grading scheme click on New Scheme.
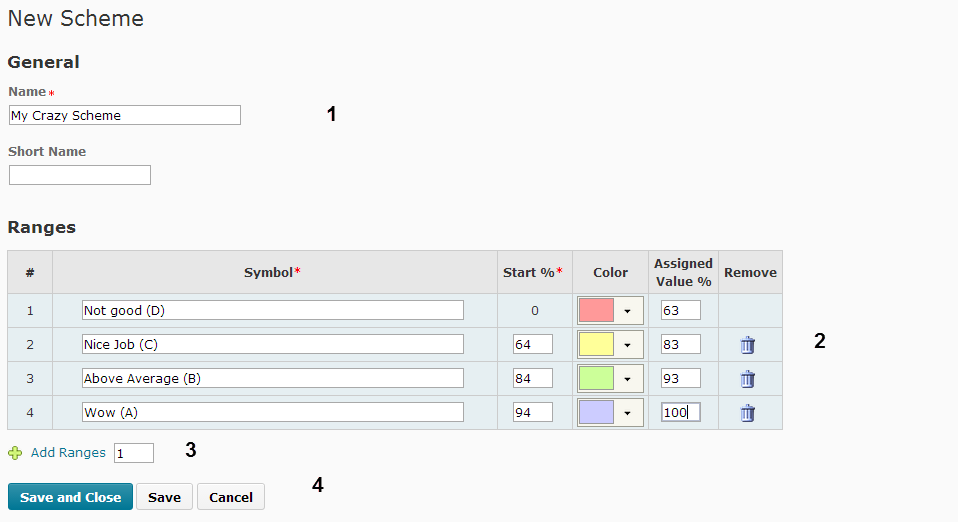
1. Give your grading scheme a Name and Short Title name.
2. Under Symbol put in the letter grade, next determine where the percentage points will start and end for each letter grade. You can also choose a color for each letter grade. This can helpful when doing a quick look at a grade item such a quiz. You can quickly see how many A's or B's students earned.
3. The default only gives you three grade ranges. Use the Add Ranges button to add more. Remember WSU final course grades can not include pluses or minuses.
4. Save or cancel.
Once you have this Grade Scheme set up for your course, don't forget to select when setting up a New Item.
Grade Settings
You can change several settings in your grade book even after it's set up.
Personal Settings
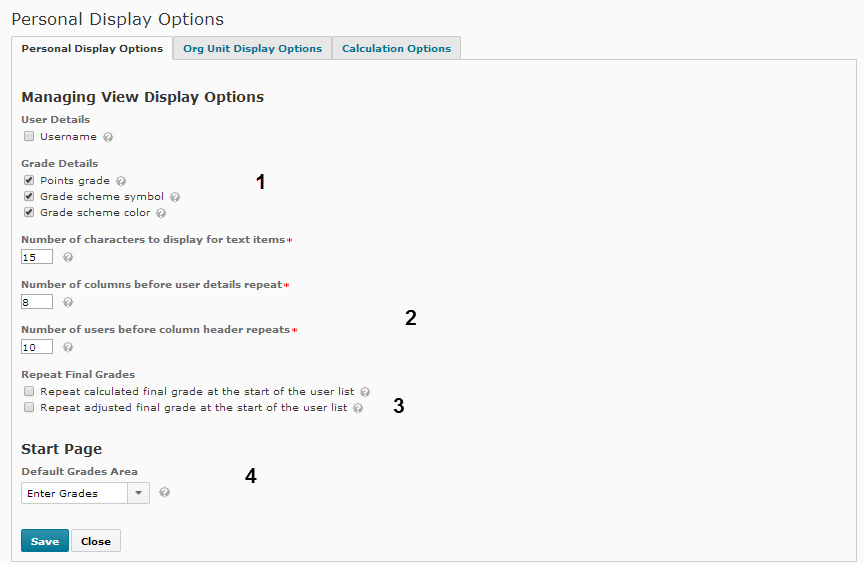
1. This is how the teacher would view grades. Checking Points Grades will show students their points, Grade Scheme Symbol will show students their percentage and Grade Scheme Color will show colors based on letter grades.
2. You can set the number of characters and columns to make it easier to view. The default appears works well.
3. You can repeat the Final and Adjusted Grades at the start of each user list. This allows for easier viewing of students grades for the teacher.
4. Start Page will change what viewing you will be in if you click on Grades. The default works well. Also don't forget to Save your work.
Student Display Settings
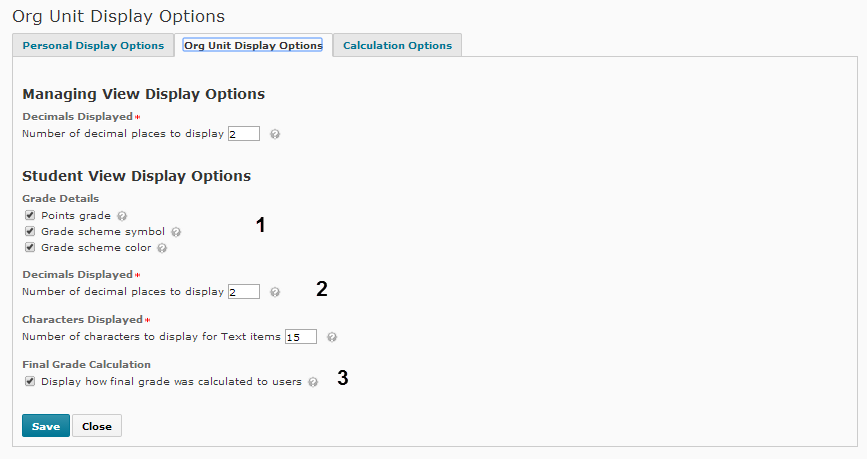
1. This is the student view: Checking Points Grades will show your students their points, Grade Scheme Symbol will show students their percentage and Grade Scheme Color will show colors based on letter grades.
2. You can decide how many decimal places you want displayed. Two is standard.
3. If you check the Final Grade Calculation the final grade will be calculated to students.
Calculation Options
Final VS Adjusted Grades
Students grades are calculated based on the grading system you set up (weighted or points). Final grades can not be adjusted unless you edit an individual grade item. Final Grades are best for large class or classes with no extra credit. To make adjustments to grades you would want to use the Adjusted Grade. This allows you to modify or adjust the users' grade before releasing it.
Releasing Final Grades
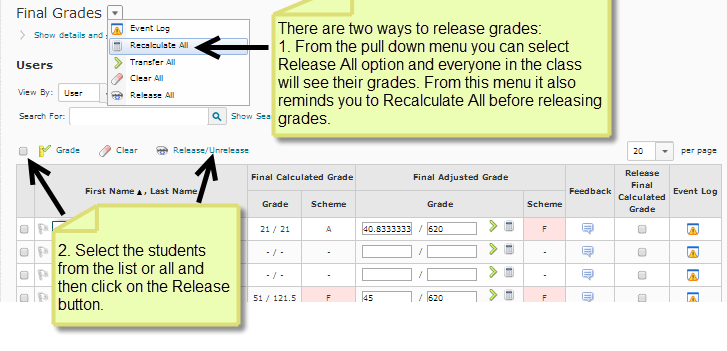
Releasing final grades can be done under the Enter Grades view.
To release final grades to INDIVIDUAL students, check the box to the left of the student's name and then the Release button.![]() Click Save to save your changes.
Click Save to save your changes.
Note: If you have made adjustments to any one student's final grade, you must choose to release the Adjusted Grade.
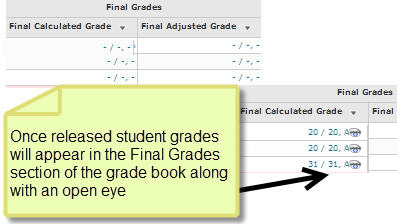
Here is what you saw before
releasing the grades:
More Information
Related Wiki TopicsNo pages meet these criteria.
|
