Copy components of a Brightspace course
(Redirected from Copying Brightspace courses)
Jump to navigation
Jump to search
Instructors can copy components of a Brightspace course (i.e., the source course), transferring some or all of its content, activities, and structural elements to another Brightspace course (i.e., the target course). Use this method to copy components across multiple sections of the same course and when preparing a new section of a course taught using Brightspace previously.
Checklist - Before you copy
- You must be a Teacher in both the target and source courses.
- Wait for any requested course merges to complete before copying.
- Class lists, grades, and other student data will not be copied. Make backup copies of student data using other methods as needed.
- Clean up and organize the source course as much as possible.
- Request a sandbox course from TLT (tlt@winona.edu) as needed. These courses are never purged and can be a handy "master copy" of a course.
- Although the target course doesn't need to be empty before copying components into it, matching filenames (e.g., syllabus.docx) may get overwritten or duplicated.
- Make note of the first day of the source and target courses. When copying time-restricted components with start, end, or due dates forward into a new term, old dates will be copied forward and must be adjusted manually. You can use the Offset Dates feature while copying to advance all your old dates forward by a set amount of time and then fine-tune them later.
- Be careful. Once you initiate a copy, it can only be reversed by deleting the copied components manually.
How to copy components
- Sign in to Brightspace and open the target course into which you want to copy components.
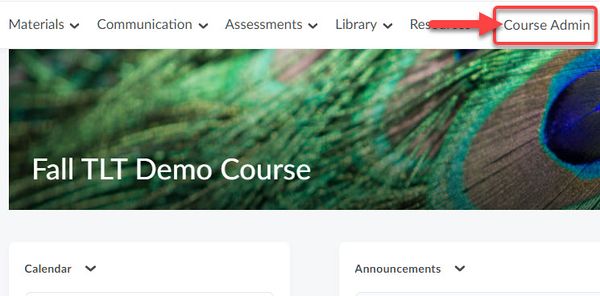
- Select the Course Admin link at the top of the course homepage (Fig 1).
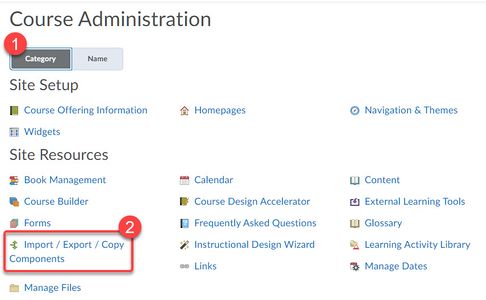
- On the Course Administration page, select Import/Export/Copy Components listed under Site Resources (Fig 2.2)
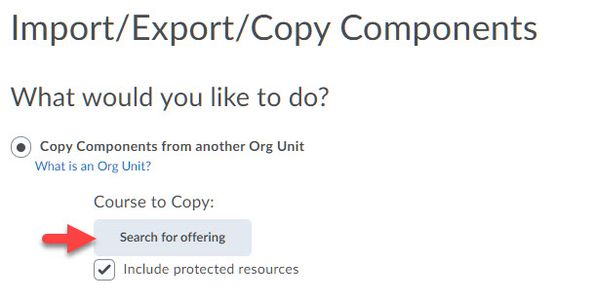
- On the Import/Export/Copy Components page, Copy Components from another Org Unit (i.e., course) should be selected by default. Click the Search for offering button (Fig 3).
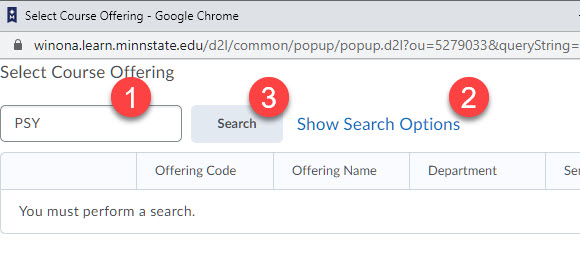
- In the course search popup window, enter a keyword (Fig 4.1) and/or adjust the search options (Fig 4.2). Select the Search button to see a list of available source courses (Fig 4.3). Selecting Search without a keyword or search options produces a list of all your Brightspace courses on the server. It helps to be as specific as possible in this search, especially if you have multiple sections of multiple courses.
- In the course search popup window, select the source course from which you want to copy (Fig 5.1) and select the Add Selected button (Fig 5.2).
- On the Import/Export/Copy Components page, double-check that the correct source course is listed (Fig 6.1). Then select the Select Components button at the bottom of the page (Fig 6.2).
- Check the Select All checkbox to copy everything or pick and choose the components you want to copy (Fig 7). By default, Copy all items is selected for each component. If you want to copy selected items within a component (e.g., a subset of quizzes), choose Select individual items to copy (Fig 7). Select the Continue button at the bottom of the page.
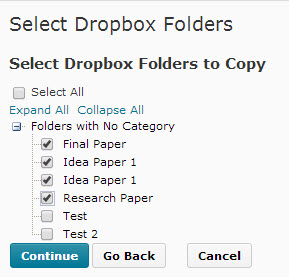
- If you chose Select individual items to copy for any of the components, you will be presented with a list of items for each component. Select the items you want to copy and click the Continue button to advance to the next component (Fig 8). Note that you may need to select the "+" icon next to the different categories that are listed to expand the list.
- Confirm the material you are going to copy and select the Finish button. Select the Modify link if you want to make any changes.
- You will see a Copy Summary page that will show the progress of the copy process. Wait until everything is copied. Successful copies will be indicated with a green check mark. Click the Done button
Checklist - After you copy
- Date restrictions (e.g. start dates, end dates, or due dates) are not updated automatically when components are copied forward into a new term. Use the Offset Dates feature while copying and use the Manage Dates Tool in the target course to make adjustments afterward.
- Open the Lockdown Browser tab in your target course after copying quizzes with Respondus Lockdown Browser or Monitor enabled. This completes a hidden configuration process that is critical for the reuse of Respondus-enabled quizzes.
Additional information
- When copying course content, make sure to select both the Content and Course Files check boxes. In the copy process, Content refers to your table of contents (i.e., the names of modules and topics). Course Files refer to the actual files to which some of your topics link (e.g., Word and PowerPoint documents). If you just copy Content and not Course Files, you will only get your table of contents and any topic link that connects to a file will be broken. If you do this by mistake, you can simply repeat the copy process and copy the Course Files only.
- If you elect to copy all components from a previous semester's course, this will copy over all restrictions (e.g., end dates) with old dates and times. These dates and times will need to be edited to correspond to the current semester. If you don't want these time-sensitive settings copied, don't select the Content Display Settings, Grade Settings, and Release Conditions components. If you do copy time-sensitive information from a previous semester, use the Manage Dates Tool to edit this information quickly.
- After a copy, review your course to confirm that everything was copied and is working properly.
Sharing course components with other teachers
There are three ways that you can copy Brightspace course components from a colleague's course:
- Be added to your colleague's class list as a Teacher. You will then have access to that course as if it was your own.
- Import an export package saved by your colleague as a zip file and provided to you.
- Access components saved by your colleague in a shared learning object repository (LOR).
Related articles
- Content in Brightspace
- Add an overview to a Brightspace course
- Add a content module to a Brightspace course
- Add a content topic to a Brightspace course
- Move and reorder content in a Brightspace course
- Edit Brightspace content topics
- Deleting Brightspace content modules and topics
- Restricting D2L content access
