Merge Brightspace courses
Jump to navigation
Jump to search
Separate Brightspace course shells are created for every section of every course each academic term. Instructors can merge Brightspace courses offered in the same term to create a new Brightspace course with a combined class list.
Why Merge?
- You teach two or more sections of the same course with identical syllabi and supporting course materials
- You teach undergraduate and graduate versions of a course that share a substantial proportion of content
- You want to collaborate with a colleague who is teaching another section of the same course
DO YOUR MERGE EARLY
Be sure to plan for any merges you wish to do before the first day of class.
Merging Course Sections
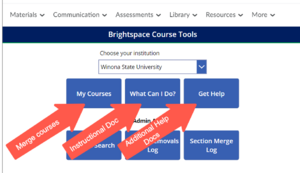
- Sign in to Brightspace and select the Course Self-Service option at the top of the screen. You can also access the Course Self-Service menu directly from outside Brightspace if you wish. If this is your first time using the application, you may be prompted to sign in and select Winona State as your institution.
- Select the '''My Courses''' button to get a list of the courses assigned to you. (See figure 1.)
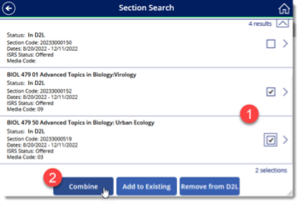
- Select the checkboxes after each of the sections you wish to merge. (See figure 2, number 1.)
- Select '''Combine'''. (See figure 2, number 2.)
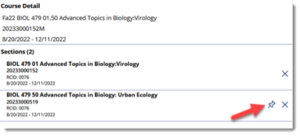
- Confirm the merge details. (See figure 3.) The first course in the course list is considered the "base" course. All content in the base course will be copied into the new merged section. You need a course other than the first course to be the base for the merge? Click the pin icon for the section you want to act as the base. Content will then be copied from the new base course.
- Type the word merge into the confirmation file and then click the Merge button.
- The merge request is then submitted. You will receive an email when the merge has been processed.
Important Details
- The original, unmerged sections will no longer be available in the teacher's or the students' course lists. Only the merged course will be visible.
- The new merged course will appear on the instructor's course list with a title and course ID that ends with an "M," indicating that this is a merged course. Unmerged courses have course IDs that end in "S" denoting them as single sections.
- The separate class lists from the original courses are merged into one for the new course. Instructors can, if they wish, separate the class-list as Sections or Groups in the new merged course.
Remove a section from an existing merge
- Open the Course Self Service application. This can be accomplished in one of two ways: Click on Course Self Service in the Brightspace navigation menu at the top right of the Brightspace page, OR Go directly to the Course Self Service application. Note: If this is your first time using the application, you may be prompted to verify access to Sharepoint. If you asked, allow access.
- Click on the '''My Courses''' button to get a list of the courses assigned to you. (See figure 1.)
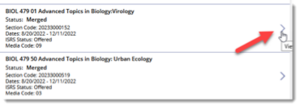
- Locate the merged section from which you wish to remove a section and click the chevron to the right of the course description. (See figure 4.)
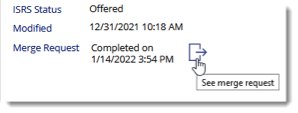
- Click the See merge request icon to the right of the merge completion date. (See figure 5.)
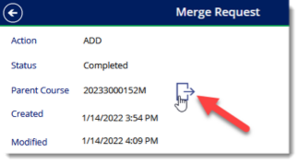
- Click on the Parent Course icon. (See figure 6.)
- Select the checkbox next to the section to remove. (See figure 7, number 1.)
- Type remove in the confirmation box. (See figure 7, number 2.)
- Click the Remove 1 section from course button.
- The remove request will be submitted. You will receive an email as soon as the removal is complete.
Add a section to an existing merge
- Open the Course Self Service application. This can be accomplished in one of two ways: Click on Course Self Service in the Brightspace navigation menu at the top right of the Brightspace page, OR Go directly to the Course Self Service application. Note: If this is your first time using the application, you may be prompted to verify access to Sharepoint. If you asked, allow access.
- Click on the '''My Courses''' button to get a list of the courses assigned to you. (See figure 1.)
- Find the unmerged section you wish to add to a merged course and click the checkbox to the right of the course description. (See figure 8, number 1.)
- Click the Add to Existing button. (see figure 8, number 2.)
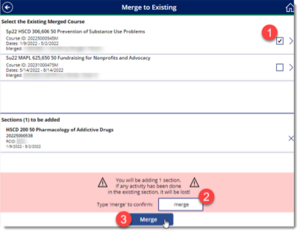
- Select the checkbox that corresponds to the merged section you want to update. (See figure 9, number 1.)
- Type merge into the confirmation field. (See figure 9, number 2.)
- Click the Merge button. (See figure 9, number 3.)
- Your merge request will be submitted. You will receive an email when the merge is completed.
More Information
Related Wiki Topics |
For a complete listing of topics, select from the category list below. |
