Create Zoom breakout rooms in advance
Hosts can create Zoom breakout rooms in advance using the corresponding meeting option in the host web portal. The desired number of rooms can be pre-built and participants can be pre-assigned to those rooms. Hosts will still need to open the rooms during the live meeting before participants will be able to join them and pre-assignment requires knowing participants' email addresses in advance. This practice is best combined with the meeting option that only allows participants who authenticate with their StarID credentials to access the meeting. Anyone who joins the meeting without being pre-assigned to a breakout room (e.g., anonymous guests) will be listed in the meeting as unassigned to a room. The host can then assign them manually if needed.
Create the list of rooms and addresses
Download the template
A CSV template can be downloaded from the meeting options section of the meeting's properties page in the host web portal.
- Log in to http://minnstate.zoom.us using your StarID credentials.
- Select Meetings from the list on the left.
- Select the meeting topic (i.e., name) from the list to open the meeting's information page. If you want to pre-assign breakout rooms to your Personal Meeting, select the Personal Meeting Room tab at the top of the Meetings page.
- Select the Edit Meeting button in the lower right corner of the page.
- Select the Breakout Room pre-assign checkbox. A Create Rooms and an Import from CSV link will appear underneath the option.
- Select the "Import from CSV" link
- Select the download link in the text at the top of the window.
- Save the breakout_room_template.csv file to your local hard drive. Do not store it on your OneDrive cloud store or the synced local folder if you have one.
- Select Cancel to close the window and return to the edit meeting information screen.
- You can either select Save to return to the meeting information screen or leave the meeting in edit mode if you are going to have your list ready quickly.
Save a copy of the template
Make a copy of the template and save it on your local hard drive. Do not store it on your OneDrive cloud store or the synced local folder if you have one. You can change the name of the file, but do not change the file format.
Add rooms and addresses to the template
- Double-click the copy of the template to open it. Do not allow Excel to change the format of the file. Do not pay attention to the POSSIBLE DATA LOSS warning at the top of the spreadsheet.
- Enter the friendly email addresses of all participants in the Email Address column. You can copy and paste these from another spreadsheet (e.g., classlist, Brightspace grade book export).
- Enter the breakout room assigned to each participant in the Pre-assign Room Name. Spaces in the room name are fine, but do not use special characters.
- Save the file. Do not change the file format.
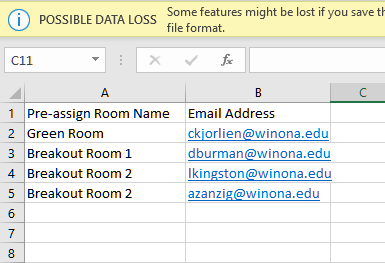
Fig 1. Add email addresses, then room assignments

Upload room assignments
- Return to the meeting information screen in the host web portal and select Edit this meeting if it isn't in edit mode already.
- Under the checked Breakout Room pre-assign option, select the Import from CSV link.
- Select browse to choose the CSV file you created from your computer or drag and drop it into the designated area.
- The upload will start immediately and and the Breakout Room Assignment window will open, displaying your rooms and assignments.
- Select Save

Fig 2. Check room assignments and save

Starting over
From the meeting information edit screen:
- Uncheck the Breakout Room pre-assign option.
- Select Save.
More wiki articles
- Use breakout rooms in a Zoom meeting
- Join a zoom meeting as a participant
- Schedule a Zoom meeting
- Video conferencing tips and tricks
- Keep Teaching Manual
- Keep Learning Manual
- Keep Working Manual