Protect your identity in Zoom meetings
If you want to protect your identity in Zoom meetings (e.g., to avoid disclosing that you are isolating or quarantining due to COVID-19), there are several steps you can take, including changing your Zoom display name, ensuring that you join the meeting with your camera and microphone disabled, and not revealing your identity through screen sharing or conversations (e.g., audio, chat) during the meeting.
Talk to your instructor or meeting host
If you have any concerns about being identified during a Zoom session, talk to your instructor or meeting host prior to the meeting. Although you can take all of the steps listed in this article yourself, your instructor or meeting host may expect to see your name as listed in a class roster or the campus directory. You might also be expected to use your microphone during the session. If you use an unfamiliar display name or refuse to use your microphone unexpectedly, it might be misunderstood and lead to your removal from the session. Finally, your instructor or meeting host may have already configured the meeting in ways that will help you protect your identity or may want you to use a specific display name. Whenever possible, work out these details with your instructor or meeting host in advance to avoid any surprises.
How you are identified in Zoom meetings
In a Zoom session, you can be identified in the following ways:
- Visually, through what you are sharing via your video camera (e.g., your face, your surroundings) or the Zoom screen sharing tool
- Auditorially, through the sound of your voice, what you are saying, and background sounds (e.g., a friend saying hello to you) picked up by your microphone
- Textually, through your Zoom Display Name and the messages you post in the Zoom chat tool
- Graphically, through your Zoom profile picture
Your Zoom Display Name
The first time you signed in to Zoom using your StarID username and password, a Minnesota State Zoom Pro account was created for you and your preferred name was added to your account profile as your default Display Name. Unless you change your default display name, enter a different display name when joining a meeting, or rename yourself during the meeting, this default display name will be visible in Zoom during every meeting in the following places:
- In the Participants list
- Underneath your video or profile picture window
- In place of your profile picture if you don't have one
- Next to any message you post in Chat
- In a notification message when you enter the Waiting Room (visible to hosts and co-hosts only)
Authentication and pseudonyms
Most instructors and meeting hosts require StarID authentication in order to join their Zoom sessions. Please note that, even if you use a pseudonym, your instructor or meeting host will be able to identify you in the meeting reports if they require any form of authentication. The attendance report, for example, will include your email address. This information will only be accessible by the creator of the meeting, typically your instructor or meeting host.
Zoom settings changes
Make one or more of the following settings changes in Zoom to protect your identity during Zoom meetings. You can do this temporarily for specific meetings or you can make default settings changes that will apply to all your meetings:
- Change your display name
- Change your profile picture
- Disable your video camera when joining a meeting
- Mute your microphone when joining a meeting
Sign in to Zoom with your StarID credentials
Before you do anything else, make sure you are signed in to the Zoom app with your StarID credentials. Most WSU instructors and meeting hosts require this to gain entry to a Zoom session. If you ever join a Zoom session and notice that (Guest) is listed after your display name, it's because you are not signed in to Zoom properly. Leave the meeting, sign in to Zoom using your StarID credentials, and rejoin.
How to change your Zoom settings
Temporarily for a specific meeting
- Open the Zoom app on your laptop or phone. Do this instead of clicking on the meeting link. If you have ever attended a Zoom session on your laptop, the Zoom app was installed whether you knew it or not. You will need to install the app yourself on your phone. Review these instructions if you need to install the Zoom app on your laptop or phone. Find the app on your laptop in the Applications folder (Mac) or select the Windows Start icon and search for it (PC).
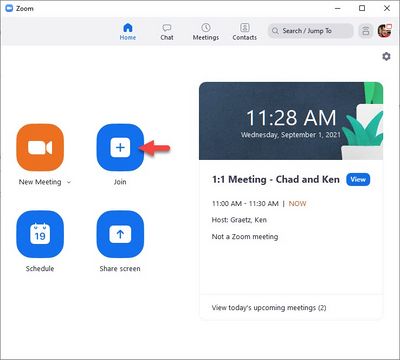
- When the Zoom app opens to the Home screen, select the Join button (Fig 1).
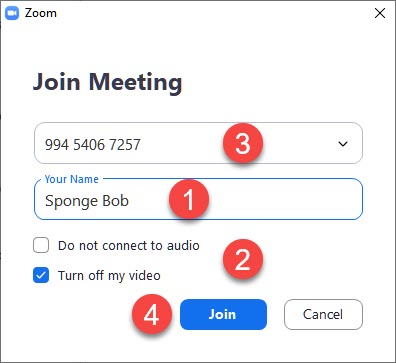
- Your preferred name will appear in the Your Name field. Change it to your pseudonym (Fig 2.1).
- Select the Turn off my video checkbox. Leave the Do not connect to audio unchecked as you will need to connect to audio in order to hear what's going on in the session (Fig 2.2).
- Paste the meeting link or meeting ID into the top field (Fig 1.3)and select Join (Fig 2.4). You will join the meeting using your pseudonym and with your camera off.
- Change your profile picture if necessary. Instructions for doing this are in the next section.
- If your mic isn't muted when you enter, mute it immediately.
- Repeat this process for every meeting in which you want to use these settings. Change these settings back for meetings in which you want to use your preferred name and/or you want your camera on when you join the meeting.
Permanently for every meeting
If you like clicking Zoom meeting links to join sessions and/or you want to protect your identity in all your meetings, then make some changes to your Zoom default settings. You can always change them back later.
- Open the Zoom app using Step 1 above.
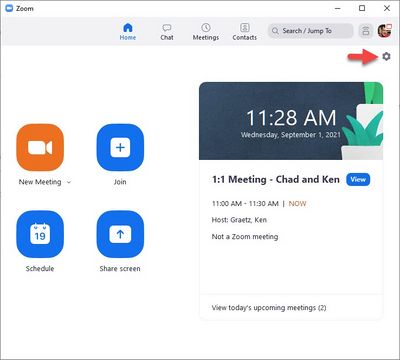
- When the app opens, select the settings gear icon under your avatar in the upper right corner of the Zoom home screen (Fig 3).
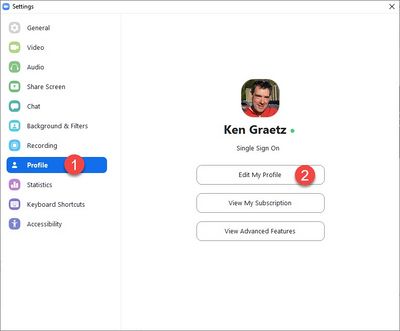
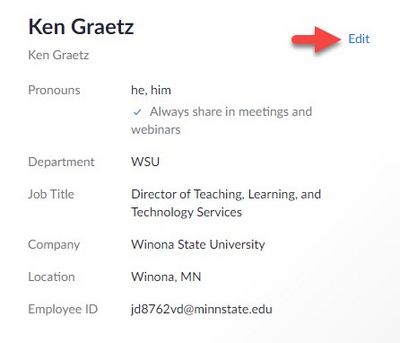
- Select the Profile tab on the left and select Edit My Profile (Fig 4). This will open your official Minnesota State Zoom Pro profile page. Select Edit (Fig 5)
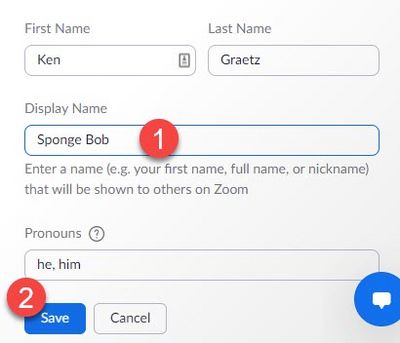
- Change your Display Name (Fig 6.1).
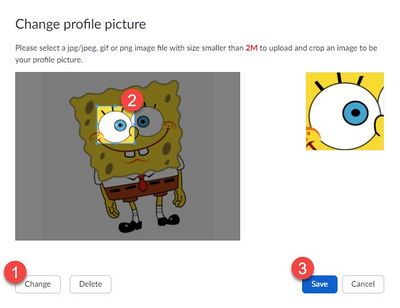
- Change your profile picture if necessary. Select your current picture, select Change (Fig 7.1), pick another image (don't break copyright law), resize and drag the preview square if you wish (Fig 7.2), then select Save (Fig 7.3)
- Select Save (Fig 6.2).
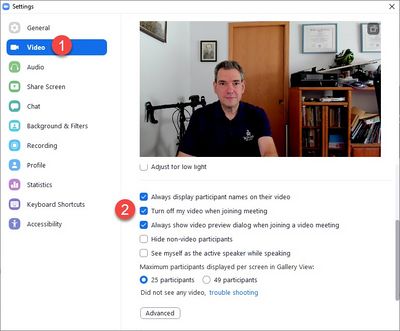
- Return to the Zoom Settings window and select the Video tab on the left (Fig 8.1).
- Scroll down and select the Turn off my video when joining a meeting checkbox (Fig 8.2).
- Select the Audio tab on the left (Fig 9.1).
- Scroll down and select Mute my microphone when joining a meeting (Fig 9.2).
More wiki articles
External links
Except where otherwise noted, text is available under the Creative Commons Attribution-NonCommercial-ShareAlike 4.0 International License.
