Prevent Zoom-bombing
There are several ways you can prevent Zoom-bombing, or uninvited participants joining your meetings and behaving badly. Restricting access to Zoom meetings is easy. Adding a meeting password, allowing only authenticated attendees to join, using a waiting room to screen attendees, and locking the meeting after your attendees arrive are all effective preventative measures. Configure specific meeting options and change global defaults to secure your meetings and protect your attendees.
The typical incident
The typical Zoom-bombing incident begins when someone joins your unprotected meeting using a fake screen name in an attempt to remain anonymous. The screen name is often offensive and easy to spot. The person then says something offensive and/or tries to screen share offensive material. The person may also type something offensive in the Chat panel or switch to an offensive profile picture. An unprotected meeting is any meeting session in which anyone can use the meeting link, Meeting ID, or personal link name to enter the meeting. This includes meetings for which the passcode has been compromised (e.g., revealed by a meeting participant, published on the open web).
What if it happens?
End the meeting
It's very common to freeze when griefed online, especially if it has never happened to you before. Your first reaction should be to end the meeting before the troll can do more damage. If you are a seasoned online community member who is used to trolling, remember that what's not that offensive to you might be very offensive to your attendees. You might think you can control it on the fly, but things can escalate quickly. Just end the meeting. You can always reconvene in minutes, after adding the proper security measures. Inform your attendees in advance what to do if you have to end the meeting abruptly.
- Select End (Fig 1.1)
- Select End Meeting for All (Fig 1.2)
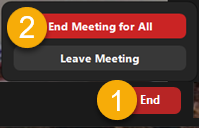
Fig 1. End the meeting for all

Press the Security button
If you decide to deal with things on the fly, without ending the meeting, Zoom hosts and co-hosts can select the Security button at the bottom of the meeting window to access a menu of useful functions very quickly. This includes:
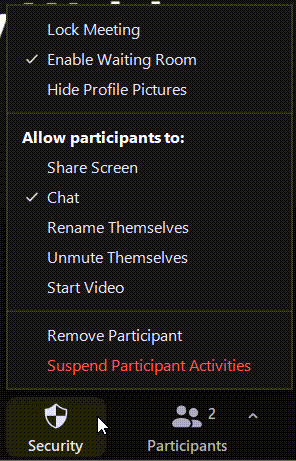
Fig X. Press Security button

- Lock Meeting. Select this to lock and unlock the meeting. Locking the meeting prevents anyone, even co-hosts and other authenticated attendees, from joining. If you lock the meeting after removing the troll, that person will be unable to return.
- Enable waiting room. Select this to toggle the waiting room on and off. This works even if you didn't enable this option when creating the meeting. Unless you changed this global setting, all waiting rooms are configured to allow authenticated attendees to join the meeting immediately. Only guests are sent to the waiting room.
- Hide profile pictures. Select this to toggle user profile pictures on and off. Profile pictures are displayed when participants disable their video cameras. They are also displayed as small thumbnails in the Participants list next to the person's name.
- Share screen. Select this to turn screen sharing on and off for all attendees. Screen sharing without host permission is prohibited across all meetings by default. If you changed the global setting or gave all participants permission to share during the live meeting and someone starts sharing objectionable material, stop the sharing and use this to remove screen sharing permissions for all attendees quickly.
- Chat. Select this to toggle the chat function on and off for all attendees.
- Rename Themselves. Select this toggle to disable renaming (e.g., to prevent attendees from changing their names to something offensive) or to enable it (e.g., to allow attendees to change their names to something less offensive).
- Unmute Themselves. Select this to give or revoke all participants' permission to unmute themselves once you have muted them, either automatically when they entered the session or manually.
- Start Video. Select this to toggle participants' ability to enable their video cameras on and off.
- Remove Participant. Selecting this opens a list of participants from which you can choose one or more to kick from the meeting. Unless you have changed the default global setting, these individuals will be unable to return to the meeting.
- Suspend Participant Activities. Select this to disable everyone's audio and video, stop screen sharing, and lock the meeting, without removing anyone from the meeting.
Top four preventative measures
Enable StarID meeting authentication
For meetings involving students and employees of Minnesota State only, this is by far the strongest security measure you can apply. Attendees need to be signed in to the Zoom client using their StarID credentials in order to gain entry to your session. You can set this at the meeting level and make it your default security method in your global settings.
- Sign in to the Zoom host web portal at http://minnstate.zoom.us and open your meeting in edit mode.
- Check the Require authentication to join option.
- Choose either StarID or Sign in to Zoom. StarID will restrict access to those who have StarID credentials. Sign in to Zoom will accept anyone who is signed in using either StarID credentials or other credentials (e.g., Google, Facebook, Zoom personal account). Make sure your Minnesota State participants know how to how to sign in to a Zoom meeting using StarID credentials. If they authenticate, they will remain signed in to their Zoom account with those credentials for subsequent meetings until they sign out or Zoom pushes a major update that requires reauthentication.
- Select Save.
Don't advertise your meeting link
Only share your meeting link, Meeting ID, or personal link name with your meeting participants. Do not publish them on public social media or anywhere on the open Web. Posting the meeting information to a protected location (e.g., Brightspace course, private Teams site) and emailing it to your meeting attendees are good ways to share it.
Set a meeting passcode
- Sign in to the Zoom host web portal at http://minnstate.zoom.us and open your meeting in edit mode.
- Check the Passcode option.
- Enter a password or use the one generated by Zoom.
- Select Save.
- Share the password with your attendees.
Enable the waiting room
- Log in to the Zoom host web portal at http://minnstate.zoom.us and open your meeting in edit mode.
- Check the Waiting Room option right next to the Passcode option.
- Select Save.
- Review the waiting room instructions for managing attendees as they arrive.
Note that the global setting for the Waiting room will put all participants entering as Guest into the waiting room. Participants signed in with their StarID credentials will bypass the waiting room. If you prefer that all participants get routed to the waiting room, you must change the global setting.
Adjust your global security settings
All of the options below can be set by hosts as global settings that will apply to all their meetings by default. Note that some of these changes will only apply to new meetings and you can also override some of these global settings on a meeting-by-meeting basis, so check your personal meeting and any existing meeting options to be sure they are configured as needed. To make changes to your global settings, log in to the Zoom host web portal at http://minnstate.zoom.us and select Settings and the Meeting...Security tab. Then adjust the following as needed:
Default settings
Our Minnesota State Zoom Pro service has the following security settings defaults:
- Waiting Room enabled. By default, the waiting room is enabled on any new meeting you create. It's configured to send, "users not in your account" (i.e., not StarID authenticated) to the waiting room and only hosts and co-hosts can admit them. Note that this means anyone who is signed into Zoom with StarID credentials will bypass the waiting room. You can change this setting by selecting Edit Options. For example, you can opt to route everyone to the waiting room by default, regardless of their authentication status.
- Passcodes enabled. By default, passcodes are applied to the following meeting types when you create them: new meetings, instant meetings, and webinars.
Other passcode settings
You can apply passcodes by default to the following using the slider:
- Your personal meeting session
- Participants joining by phone
Authentication defaults
By default, meeting authentication is disabled. Enable and configure it in your global settings to apply the settings to all new meetings. Choose StarID as your default form or authentication if most of your meetings include only Minnesota State students and employees. Decide how to hand phone-only attendees.
One-click join
Be extremely careful if you enable one-click join as a default setting. This will embed an encrypted version of the passcode in the meeting link. While convenient, this will also give trolls the passcode and could allow them access to the meeting if the link is shared.
Adjust other settings
Disable join before host
- In the Meeting...Schedule a Meeting tab, slide the Join before host slider Off if you don't want participants to enter the meeting before you get there.
Mute participants
- In the Meetings...Schedule a Meeting tab, slide the Mute all participants when they join a meeting slider On if you would like everyone's mic to be disabled when they join your session.
Disable file transfer
- In the Meeting...In Meeting (Basic) tab, slide the Send files via meeting chat slider Off if you don't want attendees to share files in this manner. Do the same for webinar chat if you wish.
Permaban
- Note that Allow removed participants to rejoin is disabled by default. Once removed, that user will not be able to rejoin the same meeting.
More wiki articles
- Get Zoom meeting assistance
- Solve Zoom meeting technical problems
- Activate your Minnesota State Zoom Pro account
- Use your Zoom personal meeting
- Scheduling a Zoom meeting
- Edit a Zoom meeting
- Invite people to a Zoom meeting
- Hosting a Zoom meeting
- Joining a Zoom meeting
- Update your Zoom application manually
- Video conferencing tips and tricks
External links
- FBI Warns of Teleconferencing and Online Classroom Hijacking During COVID-19 Pandemic
- Beware of ‘ZoomBombing’: screensharing filth to video calls
- Zoom-bombing: How to keep trolls out of your Zoom meetings
- Dispelling Zoom Bugbears: What You Need to Know About the Latest Zoom Vulnerabilities
Except where otherwise noted, text is available under the Creative Commons Attribution-NonCommercial-ShareAlike 4.0 International License.