DLC Spring 2020- Class Projects/Mary Kirk
Project Details
This resource is designed to help students in Professor Kirk's courses. In this course, you are presenting and working collaboratively in a virtual meeting room called Zoom. Zoom is a full-featured web conferencing tool that can be used on desktops, laptops, and mobile devices. It supports video and audio over the Internet, document and screen sharing, and more. Meeting hosts can create meeting sites, provide access to those rooms through a URL (see the online room for this course at Professor Kirk's Zoom Room), and then use the tools available in the room to facilitate engaging online meetings with anyone in the world via a web browser.
All WSU students can create and host their own Zoom rooms. The following directions provide instructions for participating, presenting, and creating a Zoom meeting room.
Zoom Menu Bar
To enter a Zoom meeting as a participant click on the link provided by the host of the meeting. When you join a Zoom room a menu bar will be at the bottom of your screen. You will need to hover your mouse near the bottom and the Zoom Menu Bar will appear. Below is a description of the items on the menu bar.
- Mute/unmute audio
- Stop/start video
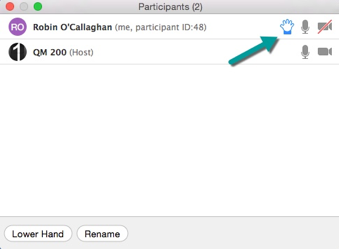
- View a list of participants in the room. This will also allow you to see if anyone raised their hand if they have questions.
- Screen share your desktop or specific application
- Conduct a group or private
- Leave the video meeting
How to Mute and Unmute Your Audio
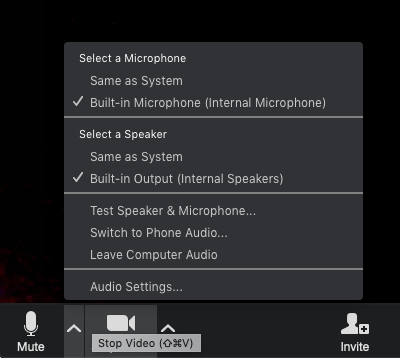
Select the microphone in the lower left-hand corner of the screen to activate your microphone. Select the icon again to mute.
To select a different microphone or adjust your audio settings select the drop-down next to the microphone icon.
How to Start and Stop Video
Select the camera in the lower left-hand corner of the screen to activate your video. Select the icon again to turn stop your video.
To adjust any video settings select the drop-down next to the video icon.
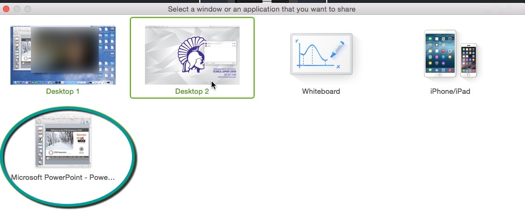
During a virtual meeting, you can switch back and forth between screen share and video as often as needed. To share your screen select the “Share Screen” icon.
Then click on the item you want to display, and then click “OK.” You can choose to share a variety of items including any applications that are open, your desktop or a whiteboard. Once you share, the Zoom Menu Bar will be at the top of your screen. Again, you can hover your mouse near the top so that the Zoom Menu Bar will appear.
Participating In a Zoom Meeting
Participant Icon
Select the "Participant" icon to view who is listed in the room. From the participant window, you can also raise your hand to ask a question and rename yourself by selecting your name from the participant list.
Chat Icon
Select the "Chat" icon in the menu bar to chat with the entire room or an individual.
Joining Or Leaving a Zoom Room
To join a meeting, you simply click on the link provided by the host. The meeting will open once the host has joined the room. You can leave your meeting room by clicking on the “Leave Meeting” icon in the bottom right-hand corner.
Virtual Meeting Best Practices
It’s important to keep in mind that even though this is a virtual meeting your location and surroundings are important. Here are some basic things to remember to create a professional virtual environment.
- Background – Check the background and rid the space of any clutter or distractions. You also want to make sure you are not positioned in front of a window as this can cause you to appear like a shadow. Keep your background simple.
- Noise – Is there background noise that could prevent participants from hearing clearly? It is recommended to conduct the webinar in an office or quiet room. Make sure to shut the door and hang a sign stating you are in a virtual meeting asking people not to enter or knock on the door. Also keeping your mic muted when you are not talking can help cut down on excess noise.
- Lighting – Double check the lighting when you launch the meeting and the video has started. Make sure more light is on your face than coming from behind you. You might also need to adjust where you are sitting so the light is not right above your head and within the camera framing.
- Framing – As an additional consideration be aware of your distance from the camera (not too close, not too far). You want to try and have the camera at eye level.
Creating a Zoom Room
Minnesota State controls the Zoom instance used by all colleges and universities in the system. It is this instance that we at Winona State University use for hosting virtual meetings.
You can access the official instance of Zoom at https://minnstate.zoom.us. Use your Star ID and password to log into Zoom.
Once you are logged in, you will be asked to join a meeting, host a meeting, or proceed directly to your user profile. See the video below for creating a Zoom room so you can host a meeting.
Support
Contact TLT with any questions regarding Zoom. Email TLT at TLT@Winona.edu, please include Zoom in the subject line. Phone support is available by dialing 507-457-5240, option 2 Monday-Thursday 8:00am-8:30pm, Friday 8:00am-4:00pm
If you would like to set up a testing session with a TLT staff member please send a request to TLT@Winona.edu.
More information
Zoom training
Related Wiki topics
- Protect your participants' identities in Zoom meetings
- Protect your identity in Zoom meetings
- Update your Zoom client
- Zoom Webinars
- Create recurring Zoom sessions
- Test Zoom
- Sign in to Zoom using guest credentials
- Sign in to Zoom using your StarID
- Install Zoom
- Using a document camera in a Zoom meeting
DLC STARS/Presenter
- Chad Kjorlien
- ckjorlien@winona.edu
Other Resources
DLC Support
- Phone: 507-457-2206
- Email: dlc@winona.edu
- 1:1 Support: Krueger Library #105


