DLC Spring 2025 Class Projects/Andrea Wood
Project Details
This resource is designed to help students in Professor Wood's courses. This resource is intended to support groups as they record their Research-Vased Vidcast Episode (Group Project) using Zoom. Zoom is a full-featured web conferencing tool that can be used on desktops, laptops, and mobile devices. It supports video and audio over the Internet, document and screen sharing, and most important for this assignment, recording your episode. All WSU students can create and host their own Zoom rooms. If you are new to Zoom, here are the directions ( Sign in to Zoom) to get up and running in Zoom. The following directions also provide instructions for sharing Zoom recordings to our media-sharing service called Kaltura MediaSpace and then to a D2L Brightspace Discussion Post so your class can see your episode.
Zoom
Scheduling a Zoom Meeting
Use the Zoom web portal to schedule a Zoom meeting. Configure the meeting to meet your needs. Schedule standalone, recurring, and persistent meetings. Assign alternative hosts, add a password, pre-build breakout groups, and more. Sign in to the Zoom web portal at https://minnstate.zoom.us and follow the steps below:
1. Select Sign In, you will be prompted to use your StarID and password
2. Select Meetings from the tabs on the left.
3. Select the Schedule a Meeting button (see below).
4. Enter a topic (i.e., meeting name) and description (optional) 5. Enter timing information 6. Set your meeting options. 7. Select Save to finish.
Sharing Zoom Link With Group
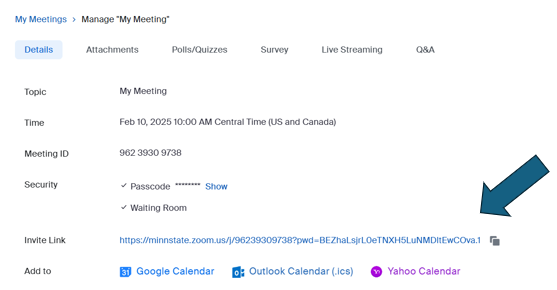
Once you create the Zoom meeting you will be taken to a page that has an Invitation Link (see clip below) and you can share this with your group and anyone else who is participating in the recording of your episode.
Recording With Zoom
Once you are ready to meet with your group and record your vidcast you will want to close all unnecessary applications on your computer. The person recording and who will be sharing video clips, introduction, and credits slides should have them cued up and ready to play. Zoom supports recording meetings to either your local computer or to the cloud. Meetings that are recorded to your local computer are stored as an MP4 and are available for your use and/or editing. When you record to the cloud, the video is automatically stored in your MediaSpace account. Note: The person doing the recording should log into their Kaltura MediaSpace account before recording as this creates the connection to Zoom so you can store and share your content to D2L Brightspace. See how to do this [here]. To begin a recording... 1. Click on the Record button in the toolbar on the bottom of the Zoom window. 2. Select where the recording will be stored.
- Record to the Cloud will store the recording in your MediaSpace account. This should be the default way you store videos. Not only does it save you the step of moving the video up manually, but it also keeps the videos from gobbling up precious hard drive space.
- Record on this Computer will store the video on your computer. These recordings are converted to MP4 files after the meeting closes and are stored in the Documents/Zoom folder. Use this option if you need to do any major editing to the video before you post it.
Note: For this assignment, it is recommended to record to the Cloud.
3. Record changes to Pause/Stop Recording and serves as the controls for stopping the recording.
Sharing Video During Zoom Recording
It is vital if you plan on playing a video during your vidcast episode that you carefully read and follow the directions below as it can be a tricky step to complete during a challenging part of your episode. To share video you will need to make sure the audio settings are configured on your laptop correctly so that sound will be heard during the recording. The following directions walk you through processes and it is strongly suggested that you practice this before recording your actual episode.
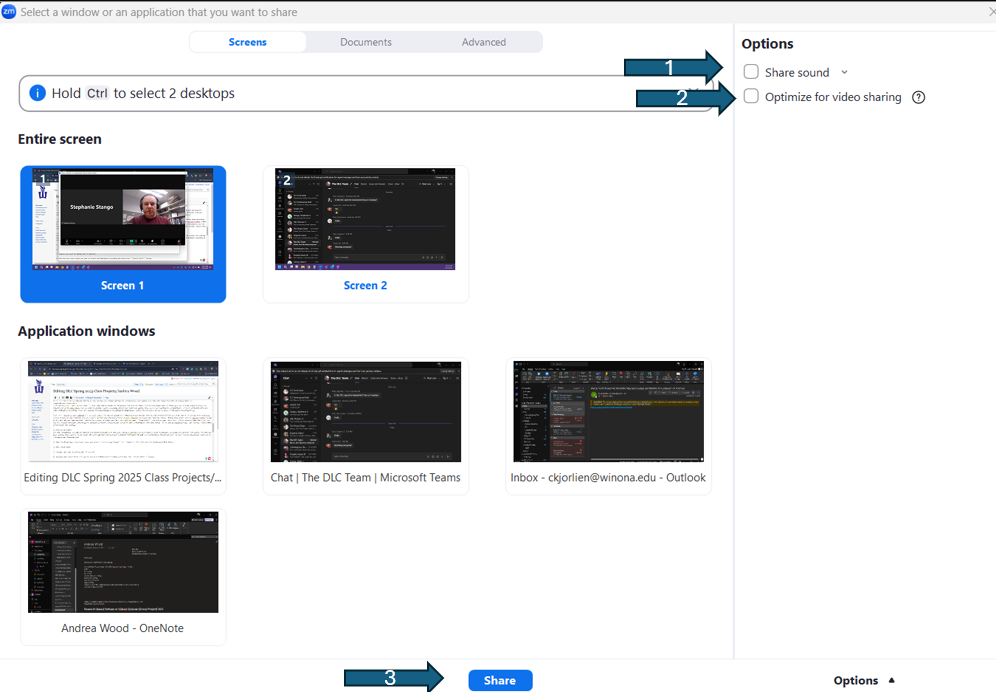
1. Choose What you would like to share during the recording.
- Screen option will allow you to jump from one video to another if you are planning on switching between different content segments.
- Choosing the specific Application will lock you into that application during that session of sharing your screen during your Zoom meeting.
Note: It is strongly suggested to use the share Screen option so you can have multiple video segments ready before you begin sharing along with your Introduction and Credits at the end of your episode.
2. Select the Share button at the bottom of your Zoom Meeting.
3. Choose Share Sound (see #1 below)
4. Select Optimize Video for Sharing(see #2) for the sound to play during your episode.
5. Click on the Share Button
Uploading Video to Kaltura MediaSpace
- If you chose to post to the cloud, your video should appear in MediaSpace. The process takes a little time (maybe more if there is a lot of other people posting and compressing at the same time), but you will eventually receive a message saying your video has been posted. Once your Zoom recording is in MediaSpace, it is no different from any other MediaSpace recording. There are complete instructions on how to share a MediaSpace recording here.
- If you stored to your computer, you will need to locate and upload it to MediaSpace (or another service like YouTube) before it can be shared. To locate Zoom recordings stored locally on your computer you will need to go into your Documents folder on your computer and locate the Zoom sub-folder. Within this folder will be session-folders (named by the date of your Zoom session). Within the session, a folder will be a file with the name Zoom_#.mp4 and this is your video file. If you store to MediaSpace, you can use the instructions on how to share a MediaSpace recording here.
Editing Video
If you need to edit your video there is a very basic editor built into Kaltura MediaSpace. While this is not intended to be a robust editor at all, it is designed to give you some basic options to remove content from your video. The following link is to a Kaltura video showing the editing tool you have within the Kaltura MediaSpace account (see here]).
Sharing Episode to D2L Brightspace Discussion
For this assignment, you will be sharing your vidcast episode with the class and will need to post this video on a D2L Brightspace Discussion Board Post. The process for sharing your episode will require you to access the recording that was uploaded to Kaltura MediaSpace through a D2L Brightspace Discussion post. To add a Kaltura MediaSpace recording to a Brightspace discussion post:
1. Open the Brightspace discussion topic and select Start a New Thread or Reply, This will open the Brightspace HTML Editor.
2. Add a post title.
3. Compose your post by adding text if desired.
4. Position the cursor where you want to insert the MediaSpace recording and select the Insert Stuff button.
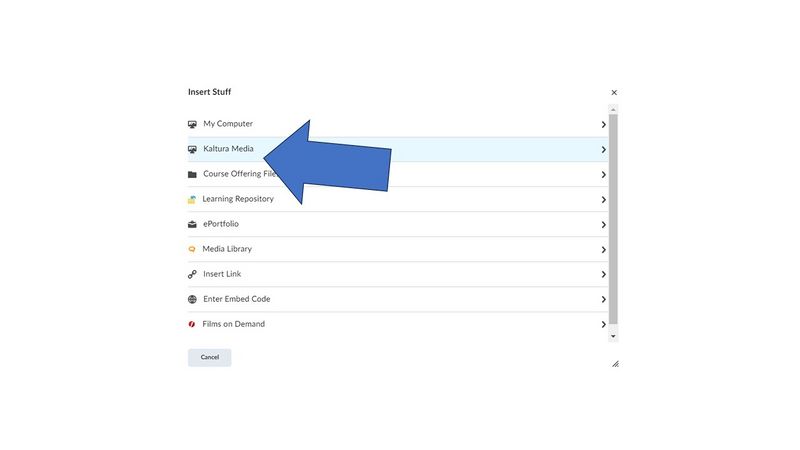
5. Select Kaltura Media (see below) from the Insert Stuff choices.
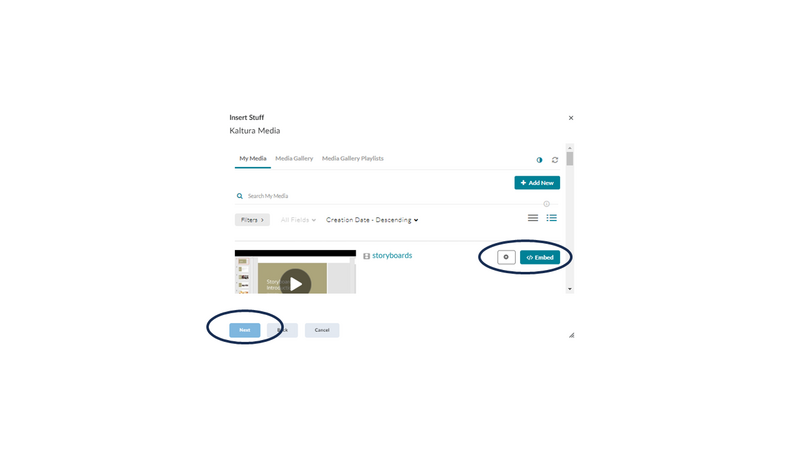
6. Content from your MyMedia account in MediaSpace will appear and you can select the file you want to insert by clicking the Embed button and then Next (see below).
7.Select the Insert button.
8. Add more text to the post if desired.
9. Select the Post button to submit your post.
More information
Zoom training
- Zoom Help Center
- Zoom training from Linkedin Learning
- From the Zoom Help Center:
- How do I invite others to join a meeting?
- My Account (account configuration, password reset, meeting-link creation, meeting, scheduling, ...)
- Managing Video Breakout Rooms
Kaltura MediaSpace
The following articles include more information about using Kaltura MediaSpace tools:
- A quick tour of the My Media page
- How to upload files with the Media Upload tool
- How to record using Kaltura Capture
- How to record videos with the Webcam Recording tool
- How to create an interactive video quiz
- How to add closed captions to your recordings
- How to trim your recordings
- How to add MediaSpace recordings to Brightspace courses
- Adding MediaSpace files as Brightspace course content
- How to schedule media availability
- How to collaborate in MediaSpace
- How to build a playlist
- Play your MediaSpace recordings
- How to create and manage a channel
- How to tell whether people are playing your recordings
- How to download MediaSpace recordings
- Update to a new version of Kaltura Capture
DLC STARS/Presenter
- Chad Kjorlien
- ckjorlien@winona.edu
Other Resources
DLC Support
- Phone: 507-457-2206
- Email: dlc@winona.edu
- 1:1 Support: Krueger Library #105


