DLC Summer 2023 Class Projects/Connie Mettille-Zoom
Project Details
This resource is designed to help students in Professor Mettille's courses. In this course, you will be working collaboratively in a virtual meeting room using Zoom. Zoom is a full-featured web conferencing tool that can be used on desktops, laptops, and mobile devices. It supports video and audio over the Internet, document and screen sharing, and more. All WSU students can create and host their own Zoom rooms. If you are new to Zoom, here are the directions ( Sign in to Zoom) to get up and running in Zoom. The following directions provide instructions for scheduling a Zoom Meeting, recording your Zoom Meeting, and Sharing that recording via Kaltura Mediaspace, and post the recording to an Assignment Submission Folder in D2L BrightSpace. Note: If you have used Zoom in the past or have used the encrypted version of Zoom it may be necessary to uninstall these older versions as we require you to be on a current version of Zoom.
Schedule a meeting
Sign in to the Zoom web portal at https://minnstate.zoom.us and follow the steps below:
- Select Sign In, you will be prompted to use your StarID and password
- Select Meetings from the tabs on the left.
- Select the Schedule a Meeting button (Fig 1).
- Enter a topic (i.e., meeting name) and description (optional)
- Enter timing information
- Set your meeting options.
- Select Save to finish.
Timing
Single meeting
The New Meeting screen defaults to a single meeting, starting at a specific date and time, and lasting for a set duration.
Recurring meeting
Select the Recurring checkbox if you wish to schedule multiple meetings at specific times, lasting for a set duration, but that repeat daily, weekly, or monthly.
Persistent meeting
Select the Recurring checkbox and select No Fixed Time from the Recurrence menu to create a meeting that never ends and can be used repeatedly, similar to your Personal Meeting. This is a popular choice for instructors who want to create a persistent room for a course that they can use for multiple purposes (e.g., class meetings, office hours).
Recording your video
Zoom supports recording meetings to either your local computer and to the cloud. Meetings that are recorded to your local computer are stored as an MP4 and are available for your use and/or editing. When you record to the cloud, the video is automatically stored in your MediaSpace account.
|
Recording your Zoom meetings is easy. To begin a recording...
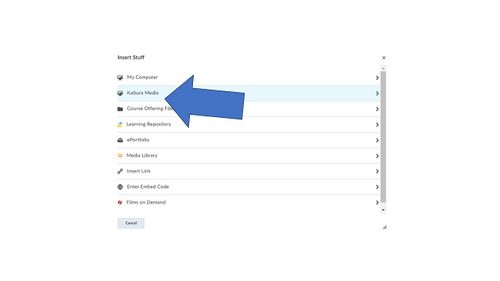
Sharing Reording to D2L BrightSpace Assignment Submission FoldersAll Zoom recordings are automatically uploaded to Kaltura MediaSpace if you choose the record your session with the Record to the cloud option. If you did record it locally to your computer then it will need to be uploaded manually by locating the recording in the Documents/Zoom folder on your computer and then Upload a media file to Kaltura MediaSpace. Once your video is viewable in Kaltura MediaSpace you can share it to a Brightspace Assignment Submission Folder with the following steps. 1. Go to the Assessments menu of your Brightspace course and choose the Assignments option. 2. Within the Assignments page, select the Assignment Submission Folder you want to embed your video. 3. Within the Assignment Submission Folder, click on the Insert Stuff button(2). 4. A series of media tools will be on this page and you will choose the My Media (you may need to scroll down to see this). 5. You should see all your videos load and can choose the one you are going to use by choosing the Embed button and hit the "Next" button in the lower-left corner. Note:If you do not see your videos you may have your browser blocking pop-ups to this site and need to adjust this setting. 6. Click on the Insert button the one you want to have in your Assignment Submission Folder. 7. Click the Submit button and you are done. More information(Note: External links below go to Zoom.com documentation) Setup your Zoom Account at WSUJoin a Zoom Meeting
Personal Zoom MeetingScheduling a Meeting
Hosting a MeetingMeeting Options - Running a Meeting
Scheduling PrivilegesVirtual OfficeSome departments, like TLT, use a virtual office to have students log in to for help. For questions on how these work or to get one of these setup, contact TLT@winona.edu. WebinarsZoom TrainingBest Practices
DLC STARS/Presenter
Other ResourcesDLC Support
|


